In this tutorial you l earn how to create 2D games using basic Java programming in this self-paced, online course. No programming experience required! We will define and program a game using the Greenfoot development software.
Approximately 12 hours to complete the lessons.
This lesson will provide an overview of system requirements, show you how to download necessary software, and describe the purpose for using Greenfoot tools to learn Java.
In this lesson you will learn to:
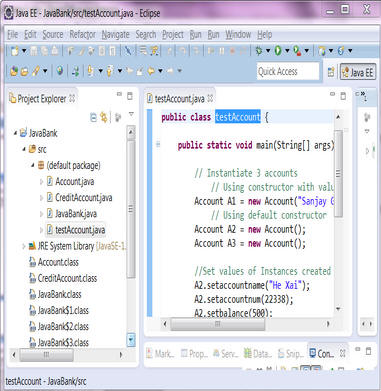
The Java programming language, like C++ and other languages, is designed for creating code that runs in production systems like Amazon.com, Facebook, and Instagram.
The language and syntax can be hard to learn, especially for beginners. Below is some sample Java code in the Eclipse development environment.
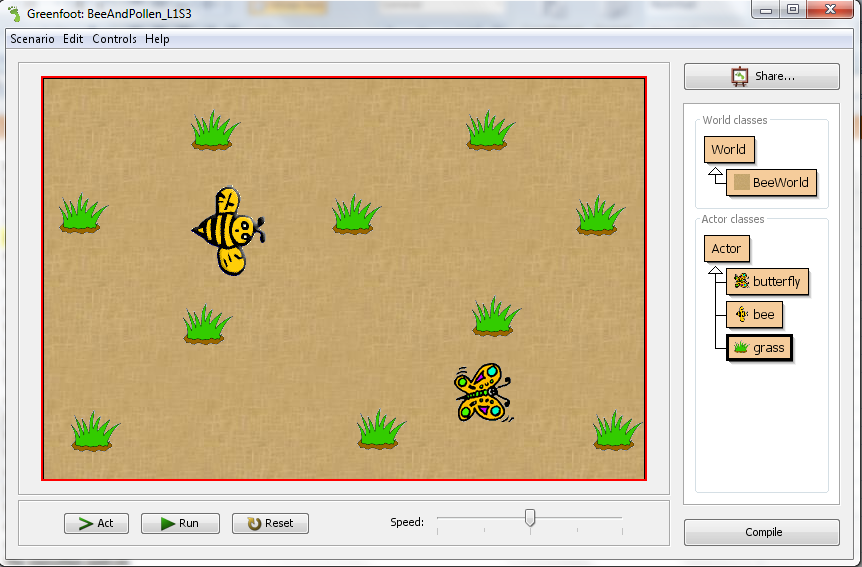
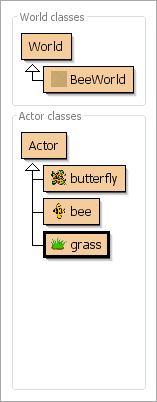
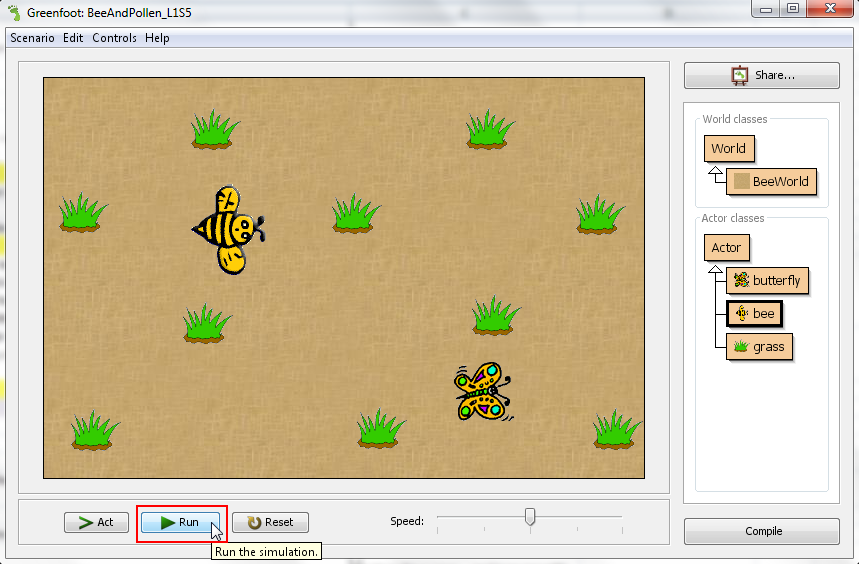
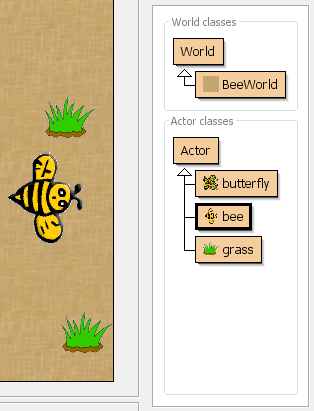
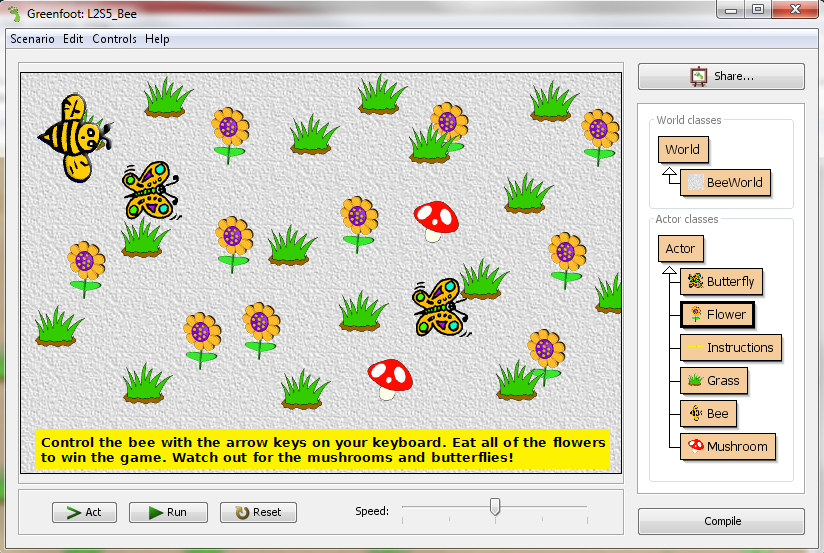
Greenfoot uses two-dimensional (“2D”) Actor objects. Programmers define the Actor objects and then drags an instance of them onto a world to create a scenario. Putting a visual representation of an object onto the world is referred to as creating an instance of an object. Look at the image below. In this image you can see that bee and butterfly instances have been placed onto the Greenfoot world. The world in this example is displayed as a grid with vertical and horizontal lines. The bee and butterfly objects are programmed in a game-like fashion to move around the world. The objects, the world, and the programming rules are what defines the scenario.
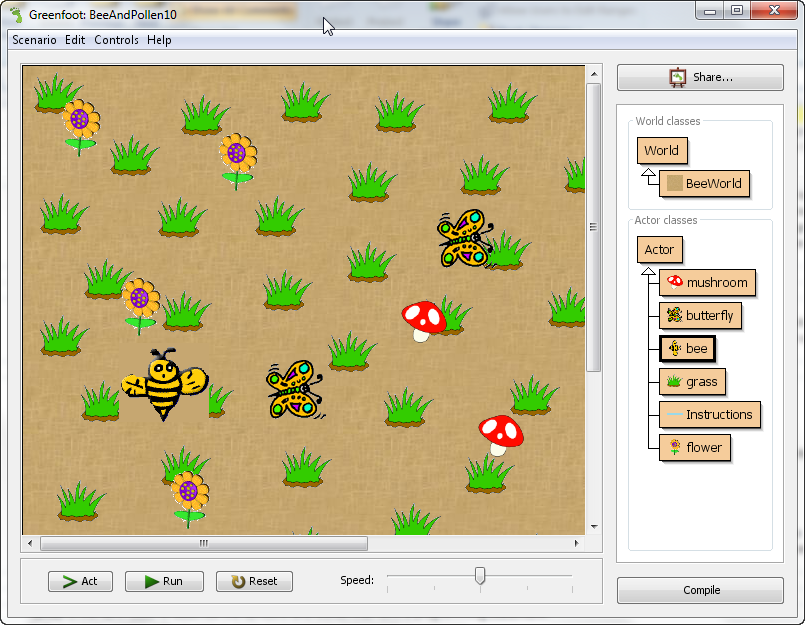
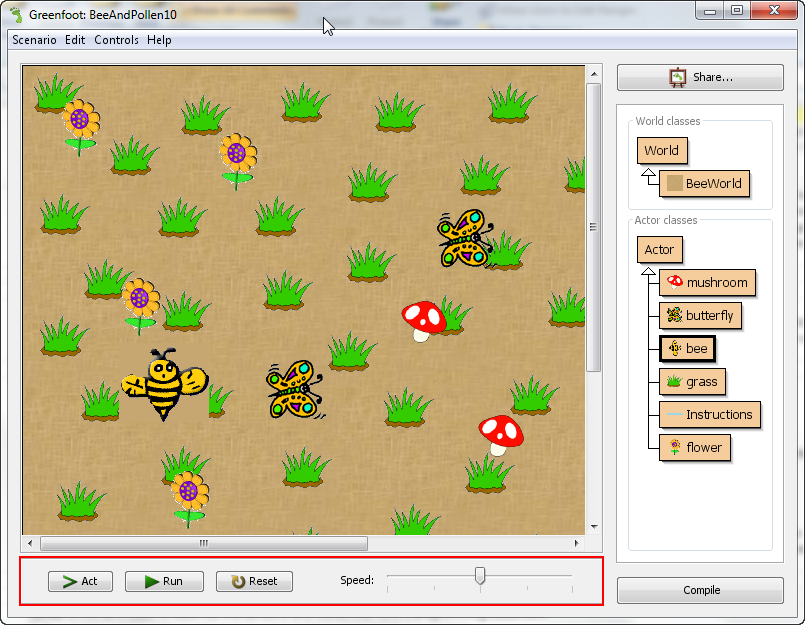
There are two other important areas in the Greenfoot image above: The program execution controls and the class display. The program execution controls let you run, pause, stop, or step through a scenario.
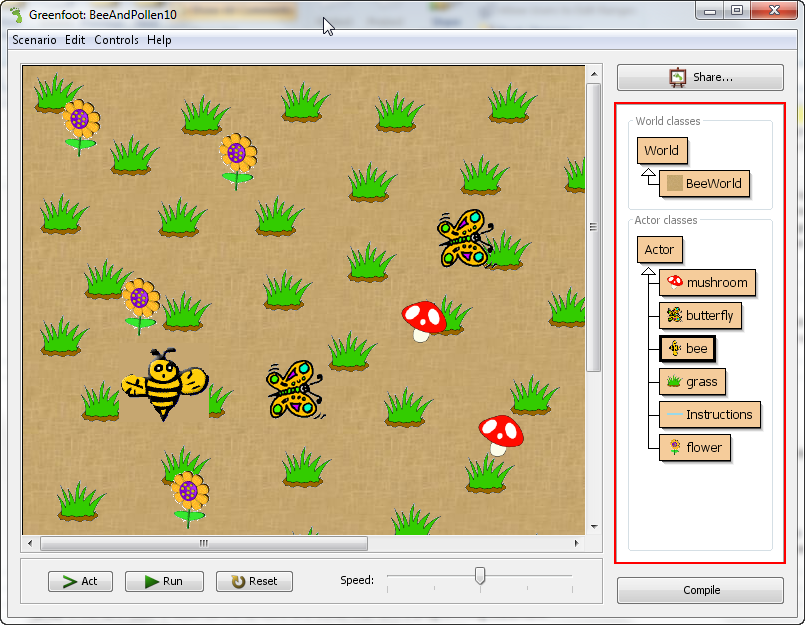
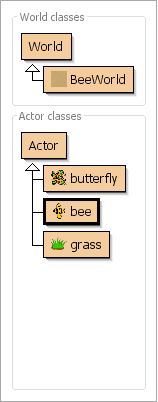
The class display is used to display the Actor object names, known as classes, in a hierarchical fashion.
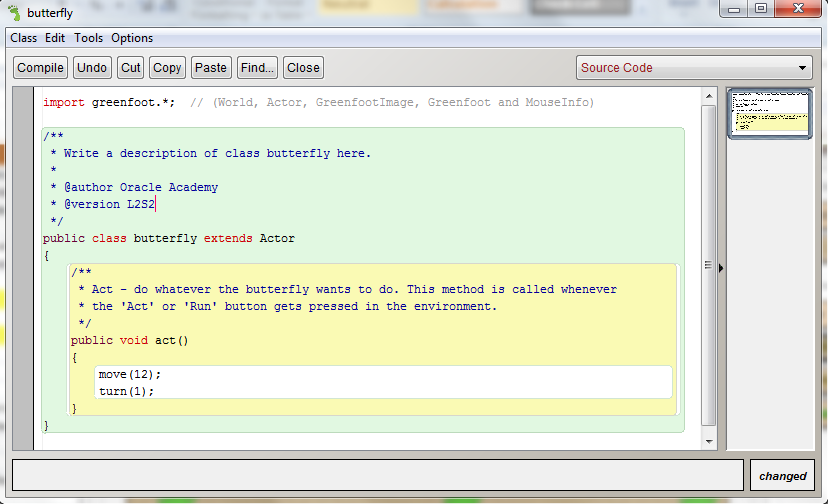
The programming statements that control the actions of the instances are actually written in each of the 3 classes. For example, you write the programming statements to move the butterflies around the scenario in the butterfly class. Every butterfly instance will execute the programming statements within the butterfly class.
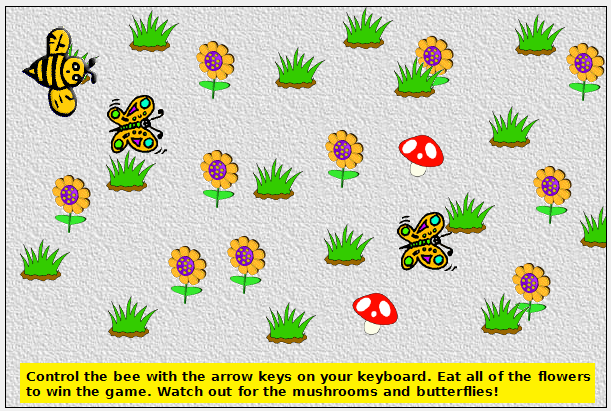
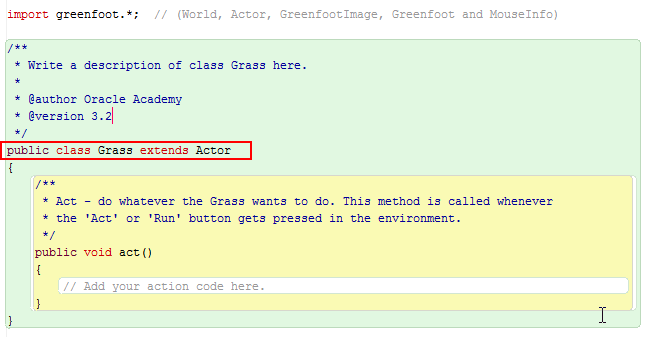
To create this scenario, we will add many flower, mushroom, and butterfly objects to the world. We will also add one bee object to the world that will be controlled by the person playing the game. The three actor objects that need to be created are Bee, Flower, Mushroom, and Butterfly. There will also be grass objects in the world that act as the scenery, as well as an object to tell us what the instructions are for the game.
Objects are instances of a class.

Object orientation is a programming paradigm that represents concepts as objects that have attributes and methods.
Syntax is the term used to describe the symbols and words that form a programming statement.
Code is a term used to refer to one or more programming statements or programs.
A scenario is the term used to define the objects, the world, and the programming rules for a graphical program created in Greenfoot.
A world in Greenfoot is the area in which objects interact.
A class is a defined object that is shown in the Greenfoot class display.

You use the Greenfoot Application Programming Interface (API) to write the programming statements for the Actor objects. Clicking twice on an actor object will display the API for the object.
Greenfoot is a visual and interactive program that uses object orientation with Java to build games, simulations, and other graphical programs. Students who are new to the Java programming language enjoy using Greenfoot because the interactive development environment is fun and easy to use. By learning Greenfoot, you are actually learning how to program! Greenfoot is also used at many colleges and universities in Introduction to Programming courses.
Visit the Greenfoot website to learn more about Greenfoot: http://www.greenfoot.org/overview
This online course includes practice exercises that you can work on to reinforce the concepts being taught. You will need to have the Java Development Kit (JDK) and Greenfoot installed on your machine. You will also need ZIP file extraction software to view the example scenarios provided in this course. Use the checklist below to ensure that your system meets the minimum system requirements for using Greenfoot.
Instructions:
Processor
Pentium 4 or higher
Operating System
One of the following:
Browsers
Any modern browser that supports Java:
Memory
Free Disk Space
Graphics
Sound Card
Software
*Note: This is required to view the videos in this course. It is not required to use Greenfoot.
The Java Development Kit (JDK) is required to use Greenfoot. You should download and install it first before downloading and installing Greenfoot.
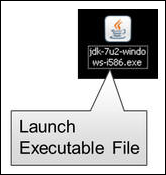

Watch this video to see an example installation of the Java Development Kit (JDK).
Instructions:
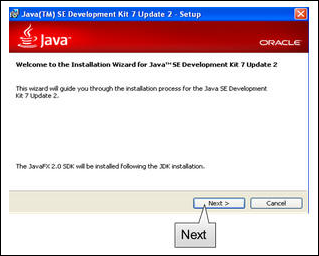
Visit this link to download and install the Java Development Kit: http://www.oracle.com/technetwork/java/javase/downloads/index.html
The Java Development Kit (JDK) is required to use Greenfoot. Ensure that you download and installed the JDK prior to downloading and installing Greenfoot.

Locate and select the correct version for your computer.


Review the file Associations settings and select the Next option.


Join the forum to get help from other users:hhttp://www.greenfoot.org/topics
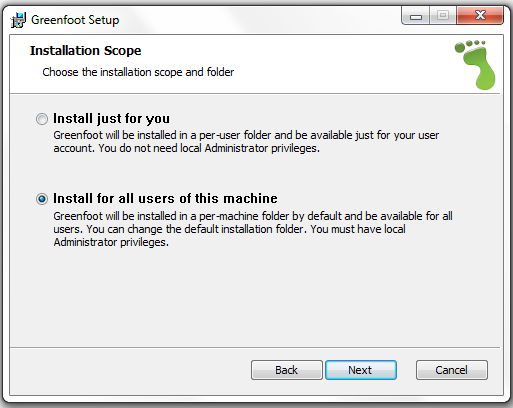
Watch this video to see an example installation of the Greenfoot software.
Instructions:
In this lesson you have learned to:
You are now ready to continue learning about Greenfoot. You can practice all of the actions described in this course using Greenfoot. If you continue through the lessons sequentially, you can use the Greenfoot files you are creating and saving as instructed. If you want to jump to a specific lesson and practice the actions described, you will need to download the practice file provided, as many of the actions in each lesson build upon a previous lesson.
A single example will be used throughout the course to demonstrate the actions in Greenfoot. Another single example will be used to complete all practice activities.
In this lesson you will learn to:
Watch this video to see a preview of what you will learn in this lesson.
An initial scene is the starting point of your game. It has three components:
The initial scene is the first scene of a game where you select the background template for the world and position the moving and non-moving objects.
Below is a graphic depicting components of an initial scene. The components include:

Watch this video to better understand the components of the Scene editor.
By opening an existing scenario, we can examine its components.
To launch Greenfoot, double-click the Greenfoot icon on your desktop. If you do not have a Greenfoot icon on your desktop, locate the Greenfoot program file in the folder in which you downloaded the Greenfoot software.

The Greenfoot interactive development environment (IDE) is made up of three main areas: the class display, the world, and the execution controls. Below is the Greenfoot IDE.

The world is where the action for your scenario will take place and where the user will interact with your scenario.
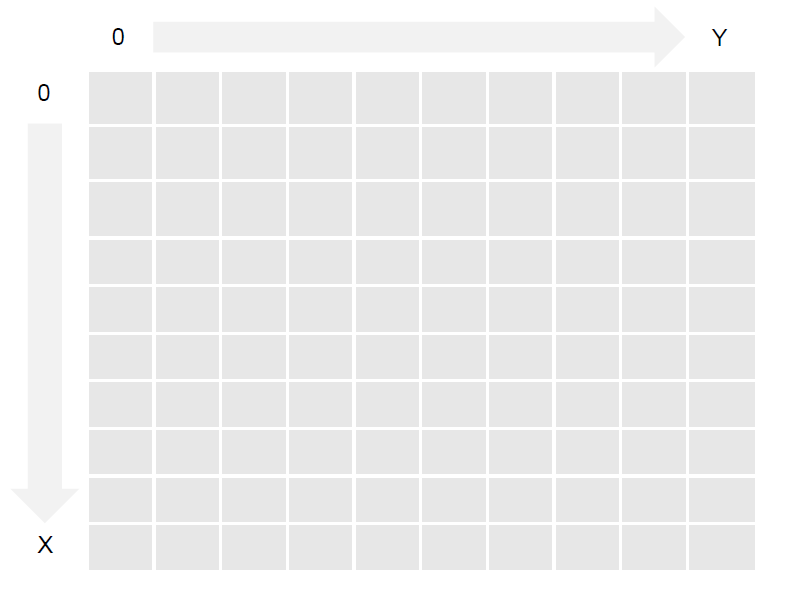
The Greenfoot World coordinate system starts at (0,0) at the top left. You can write code that specifies the size, height, and cell size of the world.

The class display is where all of the Actor objects, or classes, involved with the scenario are displayed. Each class has a Code editor where you will program the objects in your scenario to move and perform other actions.
A class contains the specifications that define the appearance and movement of an object. The class provides instructions to Greenfoot on how to create and display instances (also called objects) when they are added to your scenario.
The execution controls are used to run and control the scenario.

Steps to open a scenario in Greenfoot:
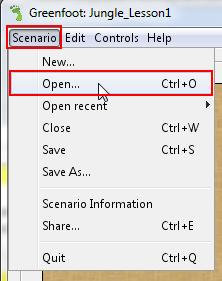
Watch this video to learn how to open an existing scenario in Greenfoot.
Download:
The activity below requires that you start with the Jungle_L1S3 scenario. Download this file and extract its contents to a folder on your computer before you complete this activity.
Instructions:
After opening an existing scenario, the next step is to add the instances that will move and act into the scenario.
The Scene editor is where you will add and position the instances that will move and act in the scenario.
A class defines the actions and the attributes of an object. Every object placed in a scenario is an instance of the class from which it was created.
In the Scene editor, you can:
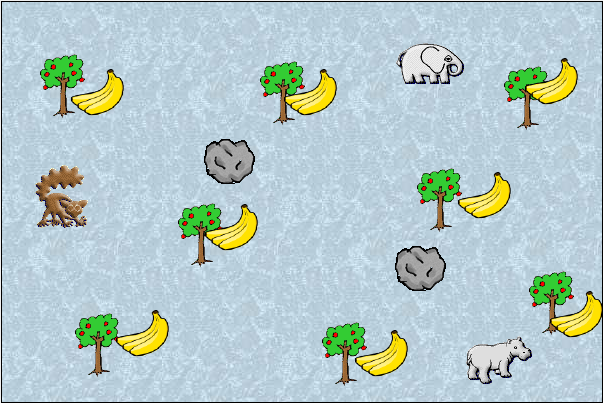
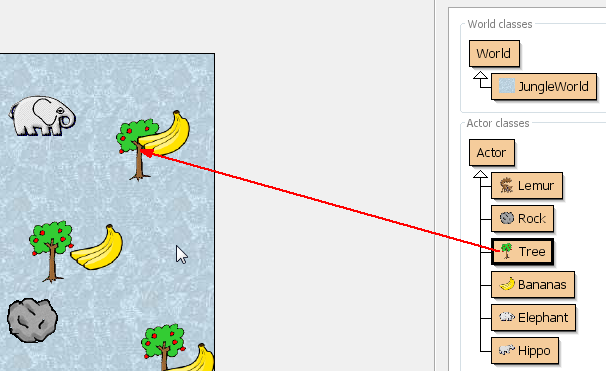
Below, the scene contains non-moving scenery instances (trees, rocks, bananas) and moving instances (elephant, hippo, lemur).
A class contains the specifications that define the actions and attributes of an object. The class provides instructions to Greenfoot for how to create and display instances when they are added to the world.
Instances are the objects from a class that act in the scenario.
Watch this video to learn how to add an instance of a class to the world.
Download:
The activity below requires that you start with the project file that was saved in the previous topic. Download this Greenfoot project file if you did not complete the previous topic's Try it activity.
Instructions:
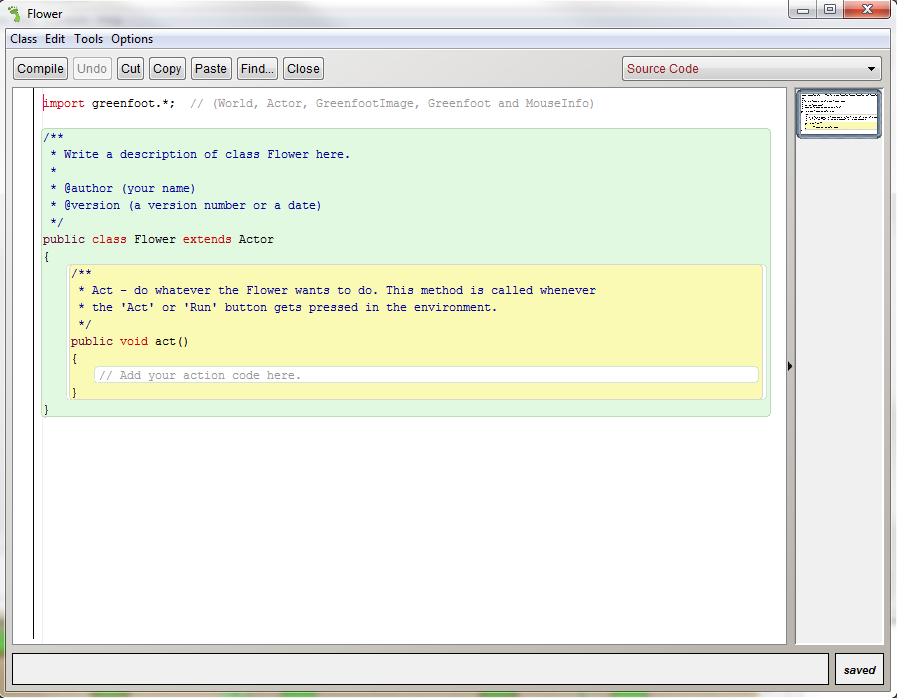
The Code editor is where you will program the instructions for how the instances of a class should act in your scenario. Opening the Code editor for a class displays all of the programming instructions for the class. Programming instructions are organized into methods in the class display. A method defined in a class comprises one or more programming statements.
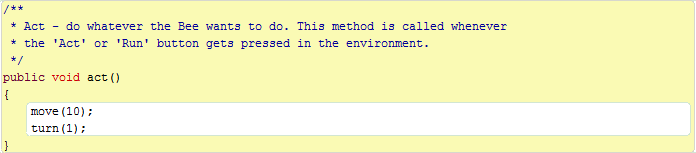
By default, each class has a method called act(). This method contains all of the actions that will execute when the execution controls are selected in the scenario. These actions can be simple programming statements, such as move forward, or they could also be others that you create, such as a method to control an object using keyboard keys.
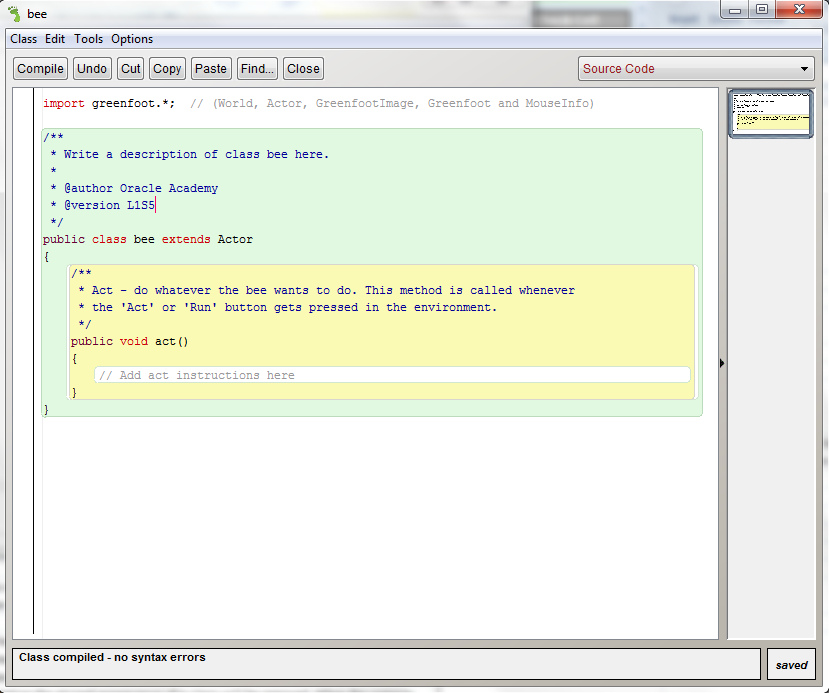
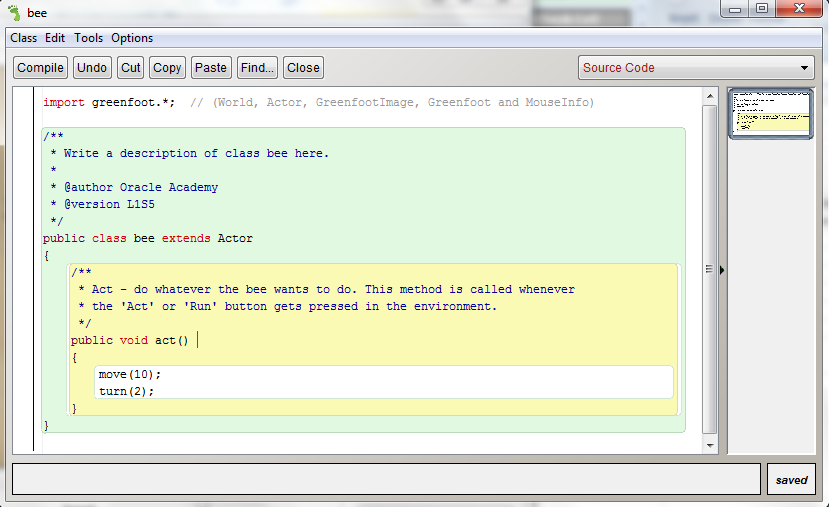
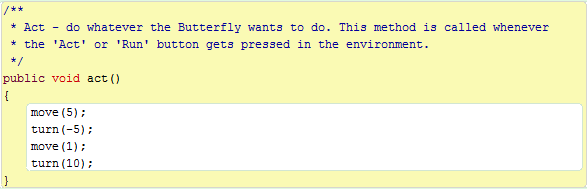
For example, below is the Code editor for a Bee class. Right now, the programmer has not written any code for the bee in the act() method. If we clicked the Run button in the scenario, the bee would stand still.
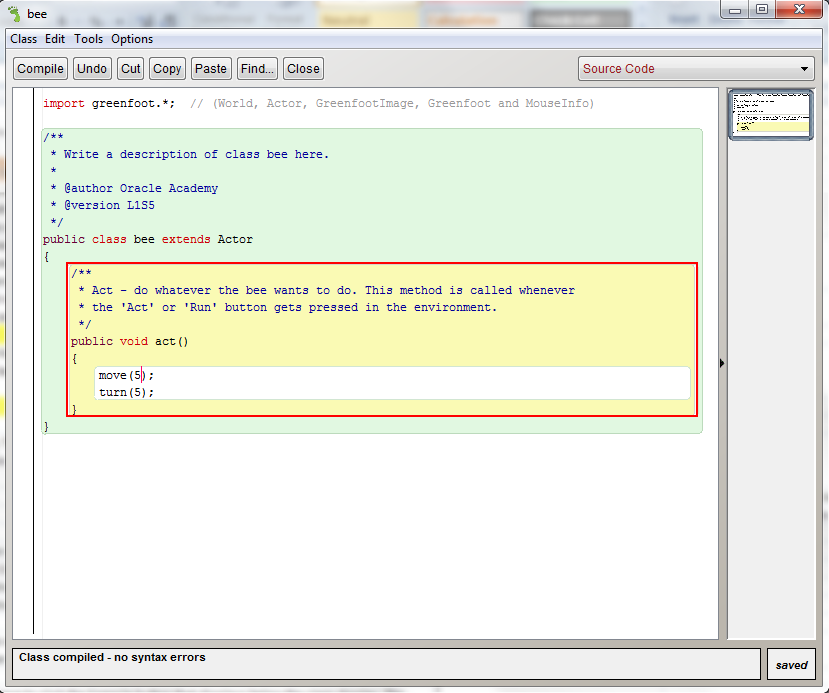
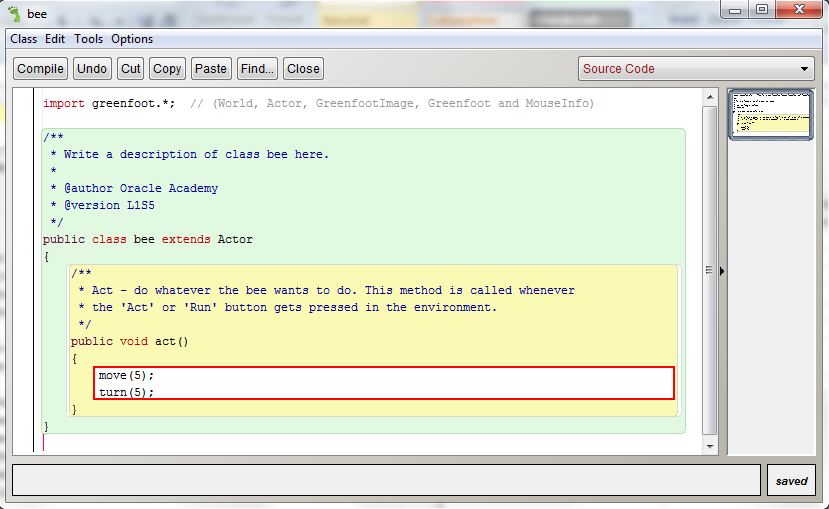
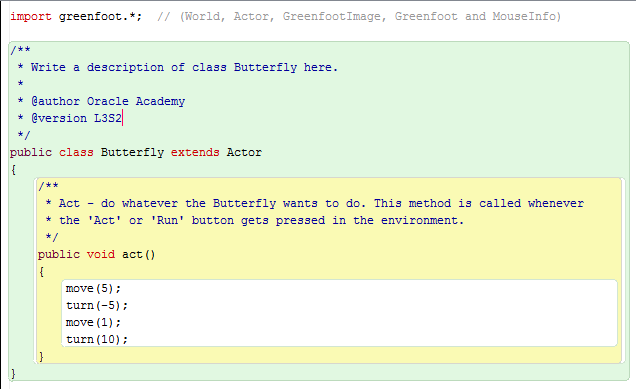
For example, if we programmed a Bee to fly around the world, the bee instance would need to receive those instructions on how to fly through the act() method. Below, we have programmed the bee to continuously move forward 5 steps and turn 5 degrees when the scenario is run. This commands the bee to turn in circles.
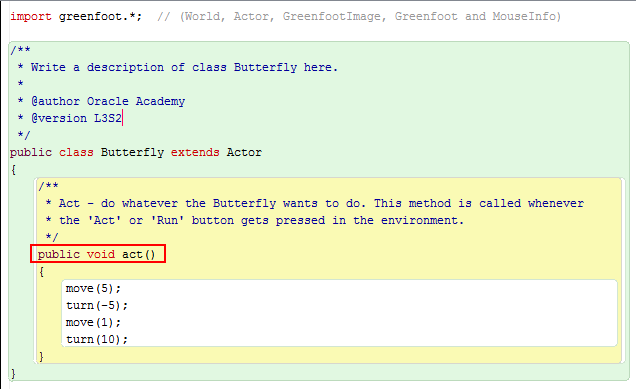
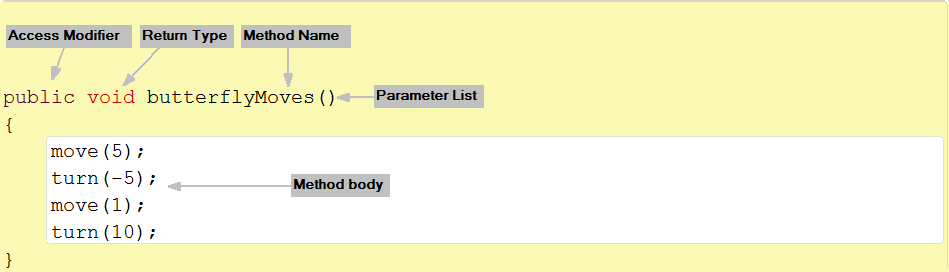
The act() method comprises a method signature and a body. The method signature for the act() method is the name act, followed by an open and closed parentheses. The method body is contained within the curly braces. Programming statements within the curly braces are called the body of the method.
For example, the Actor class has methods such as:
Enter methods in the act() method to program the instances of the class to act. For example, you can program an instance to move a certain number of steps forward, then turn a certain number of degrees.
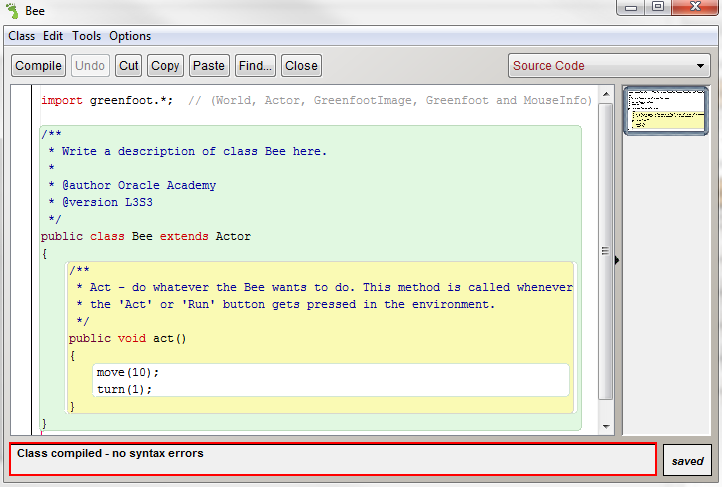
Before you can run the scenario to see what happens, you have to click the Compile button that displays below the class display.
The process of compilation translates the code you write into machine code that the computer can understand.
Compilation is required whenever the code of a class is modified or when a new class is created. You can identify when compilation is required by the striped appearance of one or more classes. After successful compilation, the striped appearance of a class will be removed. When the compile button generates an error message, you need to go back to your code to determine what has been typed incorrectly. Correct any mistakes, then click the compile button again to obtain a successful compilation.

After you have added and positioned instances in your world, the next step is to run the scenario to test how the programming instruction causes the objects in the scenario to move. In the Execution Controls area, click the Run button to run the scenario. It will run all actions in the scenario repeatedly until Pause is clicked.
Watch this video to learn how to code a programming instruction in the act() method and then run the scenario to see the results of the programming instruction.
Download:
The activity below requires that you start with the project file that was saved in the previous topic. Download this Greenfoot project file if you did not complete the previous topic's Try it activity.
Instructions:
It is good practice to save a scenario frequently as you work. Each time you close Greenfoot, it saves your current work, but while working in Greenfoot it is advised to save multiple versions of scenarios.
As your scenarios become more complex, you may wish to have multiple versions of your scenario so that you can revert back to a version. You may also want to save two versions to test out different actions without impacting your original scenario.
Steps to save a version of a scenario:
Watch this video to learn how to save a version of a scenario.
Download:
The activity below requires that you start with the project file that was saved in the previous topic. Download this Greenfoot project file if you did not complete the previous topic's Try it activity.
Instructions:
In this lesson you have learned to:
In this lesson you will learn to:
Watch this video to see a preview of what you will learn in this lesson.
Now that you have learned how to open, compile, and run a previously-created scenario, you will learn how to create one of your own. When you create a new scenario, Greenfoot will open a window displaying the world, the class display, and the execution controls. This is where you will set up your scene, adding classes to create instances for the background image, non-moving scenery objects, and moving objects.
Greenfoot has two primary perspectives within which you will build a game: the Edit Code perspective and the Scene Setup perspective. These perspectives will be referred to as the Code editor and the Scene editor from this point on.
The Code editor
The Scene editor
To create a new scenario follow these steps:
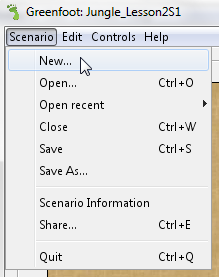
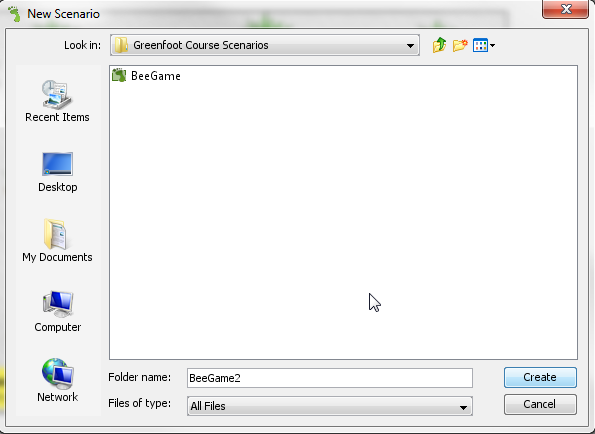
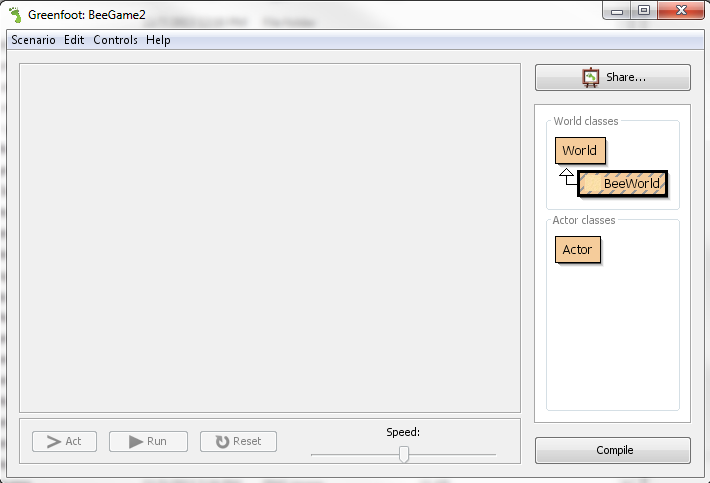
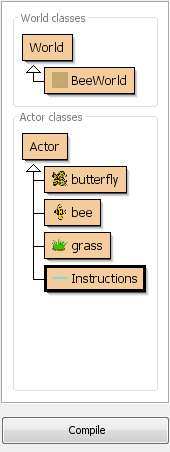
The new scenario will open in Greenfoot. The only classes that appear in the Class Display are World and Actor.

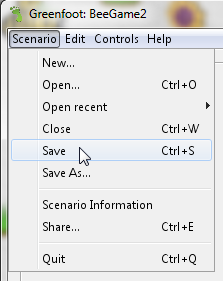
Periodically save the scenario that you are working on to minimize loss of work due to system crashes or other unforeseen events.
To save a scenario, click Save from the Scenario menu.
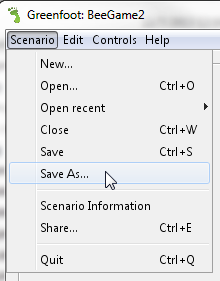
If you wish to save a copy with a new name, select the Save As… option from the Scenario menu, then enter a new name.
Watch this video to learn how to create and save a scenario in Greenfoot.
Instructions:
A class contains the specifications that define the appearance and movement of an object. The class provides instructions to Greenfoot for how to create and display instances when they are added to the world.
In nature, a bee inherits some characteristics that are common to all bees: two wings, a black and yellow color, and a stinger.
The bee may also inherit the characteristics of its breed that gives it a specific color, shape and size.
In Greenfoot, a class, such as the Bee class, defines the characteristics of all bee objects that act in the scenario, such as how they look and ways they can act.
When you add a class to your scenario, it appears in the class display (to the right of the world).
You can have as many Classes within your scenario as you require for your game to meet your concept and design.
You can add as many instances of the class as you wish to the world and they will all look and act based on the programming statements you add to the class.
The term superclass is used to describe the overarching class of a group of classes. A superclass is basically the same as any other class in Java, except that other subclasses created from the superclass inherit all of its characteristics.
For example, Insect is a superclass. Bees, butterflies, ants, and flies are all subclasses of the Insect superclass. All programming statements defined in the Insect superclass are inherited by the bee, butterfly, ant, and fly subclasses.
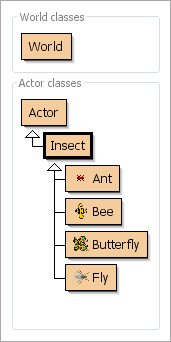
Two types of superclasses appear in the Greenfoot class display: World and Actor. These two superclasses are always visible in the class display.

You can add as many instances of the class as you wish to the world and they will all look and act based on the programming statements you add to the class.
A subclass is a child of the parent class and is created from the superclass. Subclasses are a specialization of a class.
For example, in Greenfoot, the Butterfly class is a subclass of the Actor superclass.

The butterfly subclass:
An arrow in the class hierarchy shows the subclass’s relationship to the superclass.
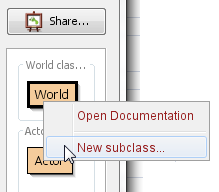
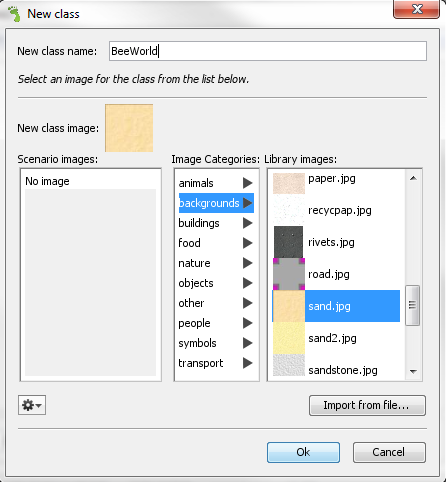
To create a background for your new scenario you will need to create a world subclass. The world subclass will hold the background image for the scenario.
Steps to create a new world subclass:
Compilation is required when a subclass or superclass is created or modified. It is also required when you create or modify the source code for a class. To compile a scenario, click the Compile button.

Watch this video to learn how to create a World subclass.
Download:
The Try it activity below requires that you start with the project file that was saved in the previous topic. Download and open this Greenfoot scenario file if you did not complete the previous topic's Try it activity.
Instructions:
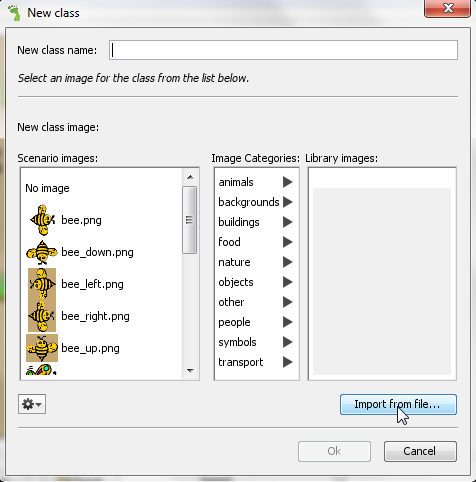
You can create a new actor subclass and assign your own image to the object. Actor subclasses hold the objects that we place in the world. In this example illustrated below there is a Bee subclass and a Butterfly subclass.

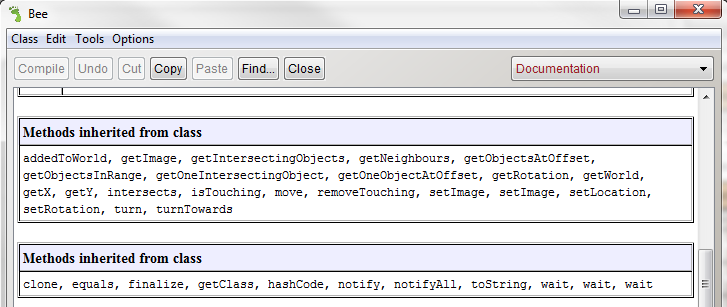
These subclasses inherit, or possess, all of the behaviors from the Actor superclass. Right-clicking on a an instance object that is placed in the world enables you to see the methods inherited from the Actor superclass.

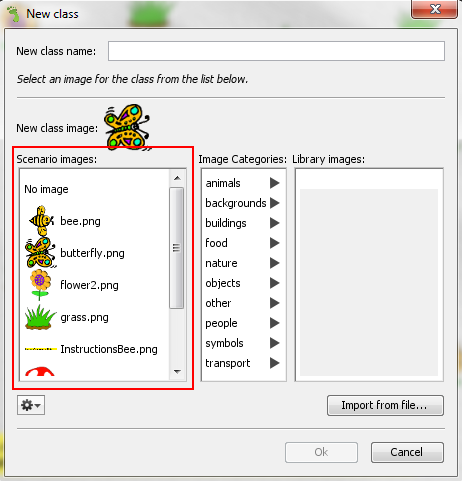
In addition to the many images that Greenfoot provides in its Gallery, you can import your own images into the gallery to use with your classes. When a new class is created you can select the option to import a file which lets you adds the image to the gallery.
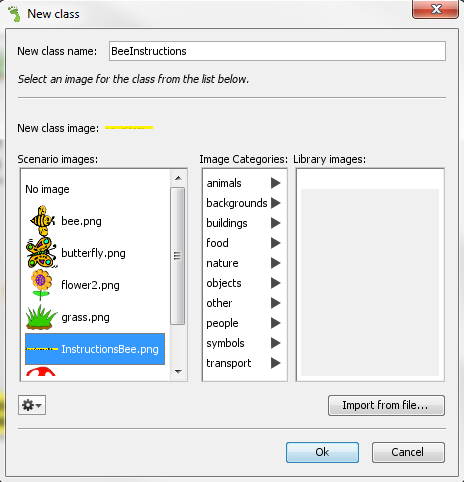
For example, you may create an image with instructions for how to play your game. You can save this image to your computer, then import the image into Greenfoot for use in a subclass named Instructions. Adding an instance of Instructions to the world will display the instructions for your game.

Steps to create a new subclass with an image imported from your computer:
When a new scenario is created, it displays one instance of the World subclass, as it provides the background template for your scenario. A scenario may display multiple Actor instances - as many Actor instances as you choose.
Steps to add an Instance of an Actor subclass to a world:
Watch this video to learn how to create a new subclass and import images into the Greenfoot gallery.
Download:
The Try it activity below requires that you start with the project file that was saved in the previous topic. Download and open this Greenfoot scenario file if you did not complete the previous topic's Try it activity.
Instructions:
Instances added to a world can be positioned when they are created or positioned later as you continue to define the scenario. There are two ways to position instances:
To drag and drop an instance with your cursor, click the instance with your cursor, and drag it to the position you want in the world.
To use methods to re-position instances:
You will notice that each time you open the scenario, you have to re-add all of the Actor instances to the world.
To save the positioning of the instances placed in the world so that they appear in the same position each time you open the scenario, right-click on the world, and select Save the World.
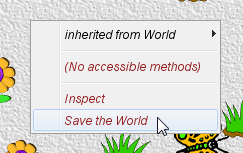
The next time you open that scenario, the instances will automatically appear in the world. You can always reposition the instances and save the world again.
Watch this video to learn how to position instances in a scenario.
Download:
The Try it activity below requires that you start with the project file that was saved in the previous topic. Download and open this Greenfoot scenario file if you did not complete the previous topic's Try it activity.
Instructions:
In this lesson you have learned how to:
In this lesson you will learn how to:
Watch this video to see a preview of what you will learn in this lesson.
Source code defines what all instances of each class are capable of doing. The behavior of each instance is determined by the source code of its class. Think of source code as a program's DNA. DNA gives humans certain characteristics, such as appearance, mobility, and communication. Like DNA, source code is written to tell the class how its instances can act in the world.
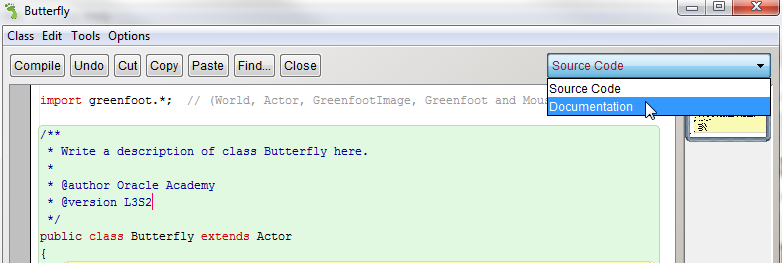
Steps to view the source code of a class:

The Code editor displays the source code of a class. This is where you add programming instructions that enable instances of the class to act. When you select Open editor, the Code editor for the class will open in a new window.
You can tell that you are in the Code editor when you see Java syntax.
You can tell that you are in the Scene editor when you see the execution controls, world, and class display.
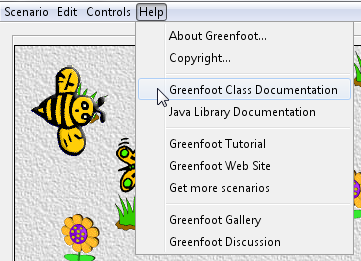
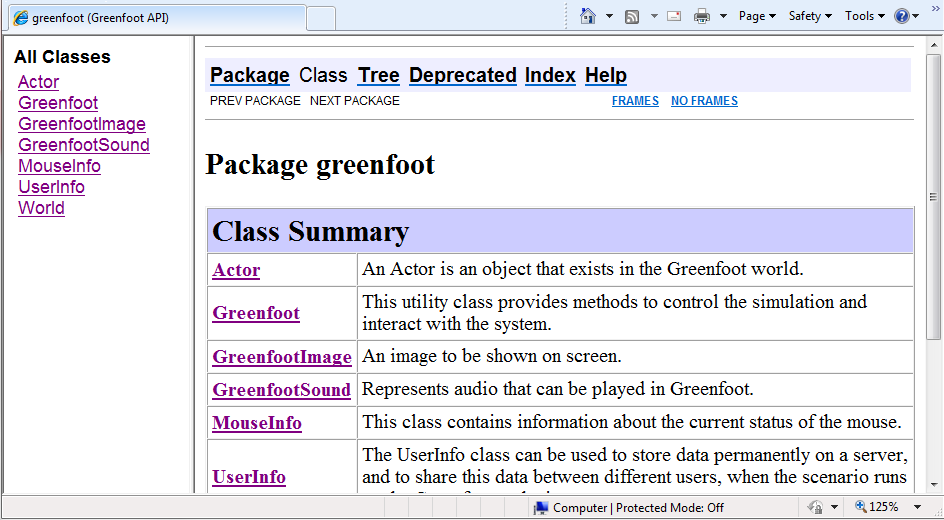
Each class inherits methods it can use. However, you can call a method that is inherited or defined (created) in a different class. There are many class libraries for programmers to use when writing class source code. You can always refer to the Greenfoot Class Documentation, which is a complete library of all of the methods you can use in Greenfoot. To use methods from another class in the source code of a class, you must ensure that you reference the Library containing the class.
From the Help menu in the Scene editor, select Greenfoot Class Documentation. This will show you all of the methods that you can use in Greenfoot.
Source code has several components that describe the class, define the actions that the class's instances will perform when the scenario is run, and describe any programmer-defined methods that you will create for the class to use. Learning what each means will help you understand how to properly write code for your scenarios.
The class description is a set of comments that can be modified to describe the class. The description includes:
The class definition includes:
The class definition defines:
Be sure to use a consistent format when you define a class. For example, define variables first, constructors second, and methods third. The import statement(s) must always be the first line of code, and must be outside of the class definition curly braces.
The act() method is the part of the class definition that tells objects which methods to perform when the Act or Run execution controls are clicked in the scenario.
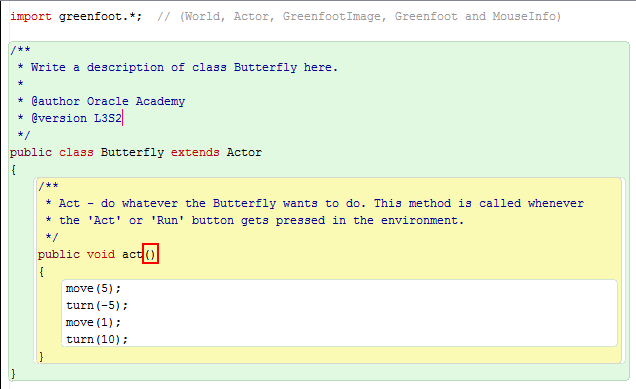
The method signature describes what the method does. The signature contains a return type, method name and parameter list.
The method name describes what the method does.

The return type indicates whether the method will return something after execution.

The parameter list allows values to be passed to a method. The parameters are typically used during the execution of the method.
Comments are used to create the class description and are also used in other areas to provide a description of the code, or to clarify a difficult concept. It is good practice to include comments in your code so that others can understand the purpose of the code.

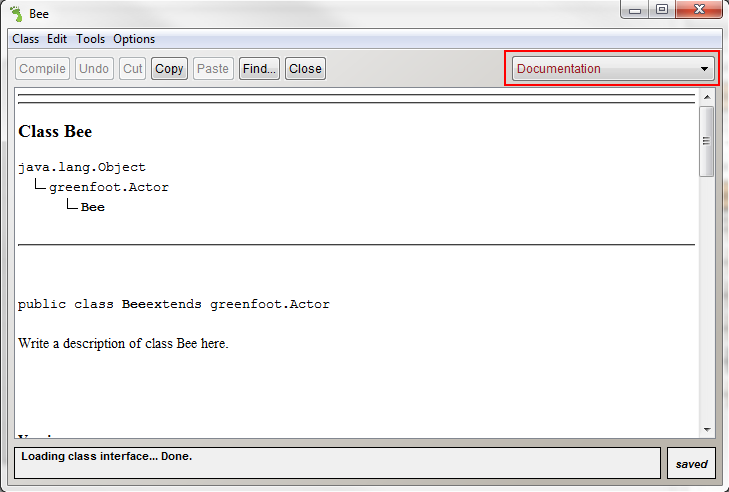
Documentation describes the properties of the class.
Steps to view the documentation:
Watch this video to review the components of source code.
Download:
Download and open this Greenfoot scenario before you complete this Try it activity.
Instructions:
Each Actor subclass object has a act() method. Whenever the Act or Run execution controls are clicked in the environment, the object will do what is programmed in the act() method. An object's behavior is defined by the programmer and is executed through the act() method.
Methods are a set of programmed operations or tasks that instances of a class can perform. When a method is invoked (written in the body of the act() method), it will perform the operation or task specified in the source code.
The curly braces and coding statements within them are the body of the method. Inside of the curly braces is where you write programming statements to instruct instances of the class to act when the Act or Run buttons are clicked. To learn more about writing the programming statements of a method, you can review the Greenfoot Class Documentation.
For example, the Actor class has methods such as:
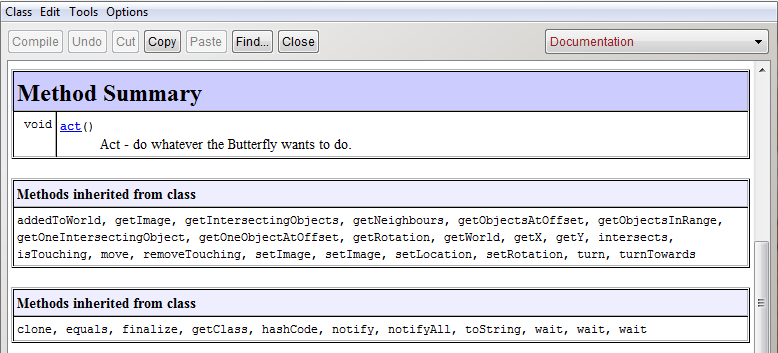
Any Actor subclass can use any of the Actor methods that you see in the Greenfoot Class Documentation. You can enter any of the Actor methods in the class you are editing. Entering a method name is often referred to as invoking or calling a method.
For example, you can program an instance to move a certain number of steps forward, turn a certain number of degrees, then display its current location. Methods must be written correctly with no typos, missing characters, or incorrect capitalization. Errors will keep the source code from compiling. An error message will display when source code compilation fails. You need to fix the errors and compile the source code again in order to continue coding the scenario.
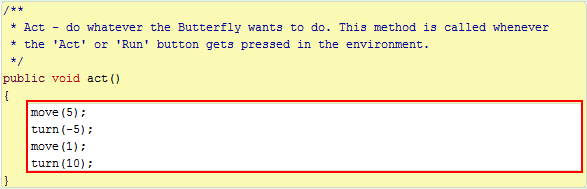
To invoke methods in the act() method, write them in sequence as follows:
Methods must be invoked to command instances to act in your game. Invoking methods programmatically means to write the methods in the body of the act() method between the curly braces.

Methods contained in the class body are executed in sequential order.
In the following example, both the move() and turn() methods are invoked, but they will be executed sequentially, one after the other.
Watch this video to learn how to code the act() method.
Download:
Download and open this Greenfoot scenario before you complete this Try it activity.
Instructions:
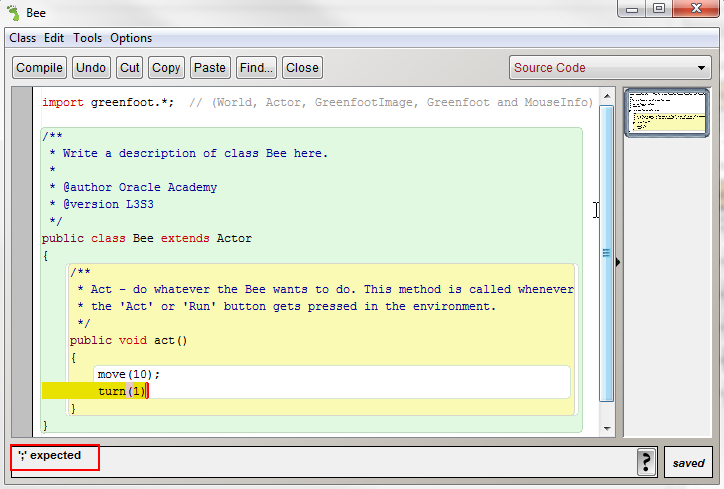
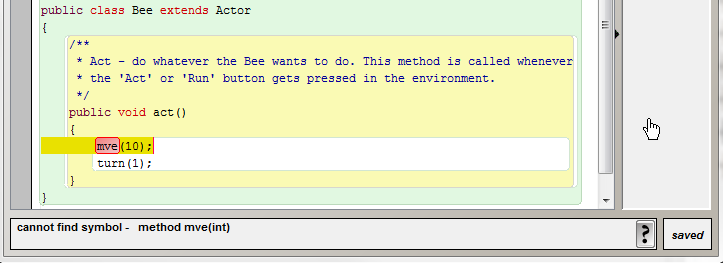
Every key stroke in source code counts. One missing or incorrect character could cause your program to fail.
In Greenfoot, the compiler highlights errors and informs you how to correct them. Identifying and correcting errors in source code helps you to develop good programming techniques. Errors in the syntax of a computer program are referred to as bugs. To debug a program you must identify and correct the errors and then compile the source code again.
Steps to debug your program:
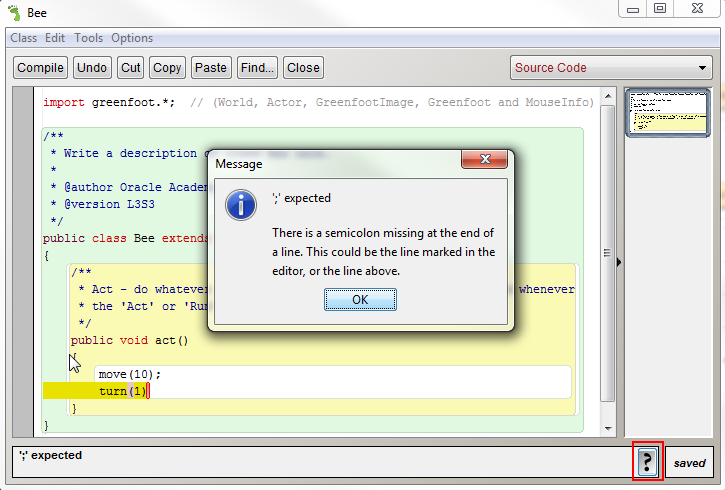
If there are errors, the incorrect syntax is highlighted and a message attempts to explain the error.
Click the question mark icon to display additional information about the error.
In the following example we should have coded the Act method to perform the following:
However when the move statement was typed, the move method was spelled incorrectly. This will not compile successfully and a descriptive error message will appear at the bottom of the screen with the incorrect code highlighted.
Here are some additional steps you can take to intentionally cause errors to see the applicable messages:
It is often difficult to find an error in your code. Saving multiple versions of your program will allow you to revert back to a version that executes successfully. Doing so will help you narrow down the error in the current version.
Watch this video to learn how to test and debug Greenfoot code.
Download:
The Try it activity below requires that you start with the project file that was saved in the previous topic. Download and open this Greenfoot scenario file if you did not complete the previous topic's Try it activity.
Instructions:
In this lesson you have learned how to:
In this lesson you will learn to:
Watch this video to see a preview of what you will learn in this lesson.
Methods are programming containers. Methods can contain one or more programming instructions. Methods tell an instances of a class how to perform a task. Methods listed within an act() method will execute in sequential order. When a method executes, or is invoked, the programming statements within the method are performed.
In programming, each object has a set of operations (or tasks) it can perform.
Write methods to tell an object how and when to perform tasks, such as:
You can write methods for the Bee class to perform tasks such as:
The Greenfoot API contains a list of all of the methods available for use by the different classes in Greenfoot. You will refer to this documentation often as you try to locate methods to use in your scenarios. The Greenfoot API is located at:http://www.greenfoot.org/files/javadoc/
Watch this video to learn more about Greenfoot methods.
Instructions:
Programmers write methods to tell an object how and when to perform tasks, such as commanding an object to perform an action or asking an object a question to learn more about what it does. When a method is declared, specific information is included in the method declaration. A Method returns program execution to the code that invoked it when all statements within the method complete or when it reaches a return statement.
Examine the components of the method declaration:
The Greenfoot Class Documentation highlights many methods that can be used in Greenfoot. Taking time to view methods listed in the documentation will help you program more quickly by using methods that already exist instead of taking time to write your own.
Let's look at some examples to examine the method declarations.
void move(4)
A move method that does not return anything and that has a parameter list for how far to move.
void turn(25)
A turn method that does not return anything and that has a parameter list for how many degrees to turn.
public int getArea()
A getArea method that is public and returns an integer (whole number) value.

Watch this video to learn more about the components of a method.
When a method is programmed to return a value after execution, the method declaration must indicate what type of data is being returned. To indicate the type of information that is returned, the word identifying the type of data (referred to as the return type) is placed at the beginning of the method declaration. For example, to return an integer value, the word int is placed before the method name. To return a true or false boolean value, the word boolean is placed before the method name.
There are two categories of return type declarations for a method:

Methods with void return types typically issue one or more commands that carry out an action.

You will invoke methods with void return types:
Methods with non-void return types typically ask the object to obtain information and return the information.

As a programmer, you will ask objects questions by invoking methods with non-void return types to learn what an object can do, or has done in the past. For example, in a gaming scenario, you may ask an object what its position is in the world, or if it is in the same position as another object. Depending on the object's position, you may command it to do something (such as eat another object, change its image, or make a sound). The response received will be in the form of a non-void return type, or data type.
int (Short for integer)
A parameter list is used to provide a method additional data needed to execute the programming statements within the method body. Parameter list values are listed within the parenthesis that follow the method name. A parameter list can contain one or more parameters. The order in which parameters are listed in a parameter list is important. When a method is invoked, it uses the parameters identified in the parameter list during execution (Using a method, calling a method, and invoking a method are interchangeable phrases).
A parameter list can contain one or more parameters separated by a comma. It is defined by three components:
void move(int distance)
void turnTowards(int x, int y)
x, y (position: int x is before int y)
void act()
no parameters (empty)
Empty: No data expected to invoke the method (getX method).
Non-empty: Have data and expect one or more parameters to invoke the method (move method).
Watch this video to learn more about method return types and signatures.
When we state that a subclass can use the methods defined in its superclass, we are defining inheritance. Inheritance transcends down the hierarchy of objects.
For example, a Flower class created from the Actor superclass would inherit the methods of Actor.
Any instance of Flower would have access to the methods of Flower, and would also inherit all methods from Actor.
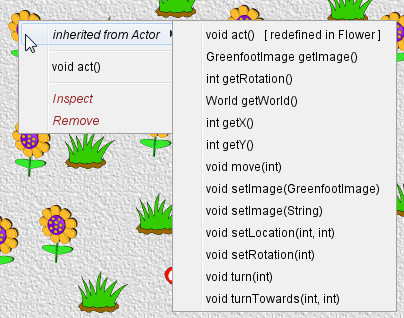
There are a number of ways to identify inherited methods:
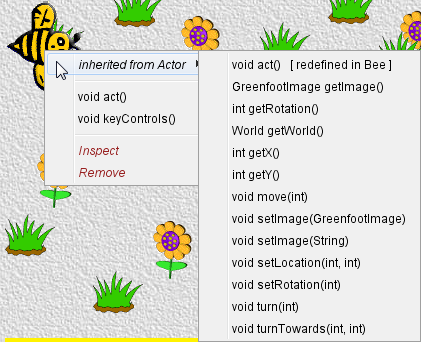
From the Help menu, select Greenfoot Class Documentation.
The menu on the left-hand side lists Java classes that can be inherited by subclasses in your Greenfoot scenarios. Click on individual classes to see the inherited methods.
Watch this video to learn how to view inherited methods in Greenfoot.
Download:
The Try it activity below requires that you start with the project file that was saved in the previous topic. Download and open this Greenfoot scenario file if you did not complete the previous topic's Try it activity.
Instructions:
In this lesson you have learned how to:
In this lesson you will learn to:
Watch this video to see a preview of what you will learn in this lesson.
If you always know how a game is going to behave, you would master the game and become bored with it quickly. Game designers use a randomization technique to make their games interesting. Randomization allows the computer to randomly pick a value, from a range of values, and present them in no pre-defined order. The combination of randomly generated and predetermined content, if planned correctly, can make interesting game play possible. In Greenfoot, the getRandomNumber() method can generate random numbers, within a specified range, that can be used to create randomly generated behavior.
The getRandomNumber method is a static method that returns a random number between zero and a parameter limit. This method is used to eliminate predictability in your program and can be used to create randomly generated content for our scenario.
A static method is a method that does not have a relationship to the class where it is defined. Think of a static method as a “utility” method that can be used by any class when a random number is needed. To use a static method you need to call the method using specific syntax. You need to:
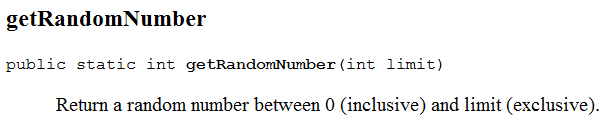
The getRandomNumber() method is a method within the Greenfoot class of the API. To use the getRandomNumber() method, we must provide the Greenfoot class call, the getRandomNumber() method call and the upper limit of the range we wish to generate the random number within.
The code below means we will generate a random number between 0 (inclusive) and 6 (exclusive) meaning we will generate a random number in the range from 0,1,2,3,4,5.

You can invoke both the move() and turn() methods with a fixed distance to move, and degrees to turn, or you can use the getRandomNumber() method to feed random numbers to both the move() and turn() methods.

Watch this video to learn how the getRandomNumber() method works.
Download:
The Try it activity below requires that you start with the project file that was saved in the previous topic. Download and open this Greenfoot scenario file if you did not complete the previous topic's Try it activity.
Instructions:
When you want to use a method but it is not inherited by the class you are programming, specify the class or object that has the method before the method name. Separate the class name and the method name with a dot. This naming convention used to call methods from a class is called dot notation.
Examine the getRandomNumber() method below:

This method must be called from the Greenfoot class using dot notation. New subclasses that you create do not inherit the getRandomNumber() method.
The format for dot notation code includes:
The getRandomNumber() method shown below:

When we use dot notation after the name of the class to which the method belongs, we will have access to all of the available methods within that class.
Understanding dot notation, and the ability to call methods defined in other classes, helps you to understand how you can use the Greenfoot documentation to understand all of the methods in the following classes:
Steps to view the Greenfoot Class Documentation:
The Greenfoot Class Documentation contains all of the methods in all classes that are available to a programmer within Greenfoot.
Watch this video to learn how to recognize and describe dot notation.
Performing sequential tasks in programming and in Greenfoot is straightforward - we create each statement one after the other. But what if the task we wish to execute is not sequential in nature? Many things around us have a cause and effect relationship, or “if-then” relationship.
An if statement is written to tell your program to execute a set of programming statements only if and when a certain condition is true.
Java syntax for writing an if statement:

An if statement condition, which is a true or false expression, determines whether or not the programming statements in one or more methods execute.

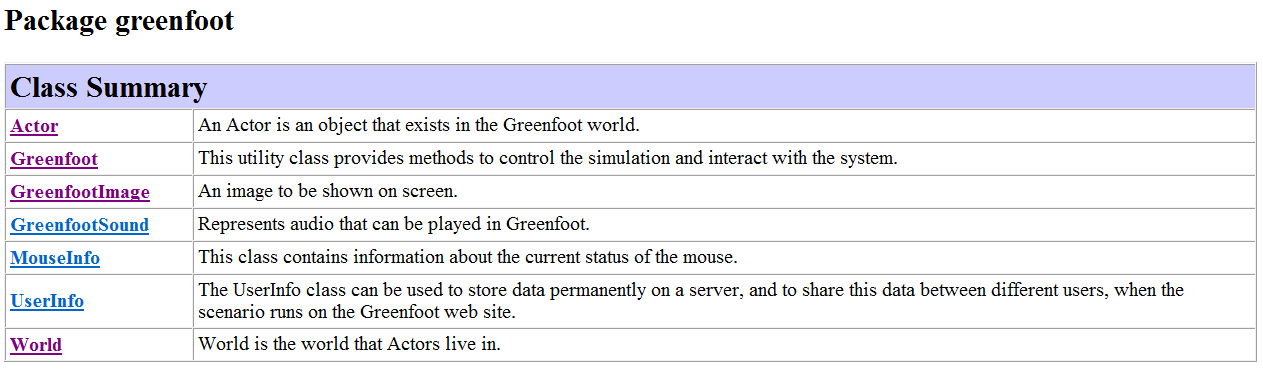
In the following example, if the butterfly reaches the edge of the world, the butterfly will turn 180 degrees.
In the following example:
Remember, the act() method is called once when the Act button is pressed. It is called repeatedly when the Run button is pressed.
The isKeyDown method is a pre-existing Greenfoot method that listens to determine if a keyboard key is pressed during program execution.
Watch this video to learn how to code an if statement in the act() method.
Download:
The Try it activity below requires that you start with the project file that was saved in the previous topic. Download and open this Greenfoot scenario file if you did not complete the previous topic's Try it activity.
Instructions:
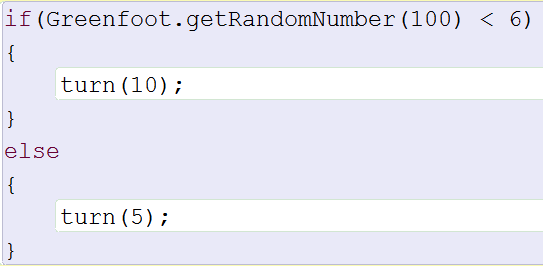
Conditional behavior is often decided on an if or else basis, for example if it is raining then take an umbrella - else leave the umbrella at home. In Greenfoot, An IF-ELSE statement can be used in a similar way to determine the behavior of an instance depending on one or more conditions.
An IF-ELSE statement executes its first code segment if a condition is true, and its second code segment if a condition is false, but never both.
Instances can be programmed to perform specific behaviors if a condition is not met, using an IF-ELSE statement. For example, if an instance is programmed to turn 6% of the time, what does it do the other 94% of the time?
The IF-ELSE statement executes as follows:
Evaluate the condition:

The format (syntax) of the IF-ELSE statement follows the same pattern every time. The if keyword followed by a condition in parentheses, with the statement to execute between the curly braces. All execution statements must end with a semicolon.

The condition is enclosed in parenthesis() and must equate to a boolean value (i.e., true or false).
The associated code to be executed for each IF-ELSE statement is enclosed in curly brackets <>:
The following IF-ELSE statement executes as follows:
Comparison operators are symbols that compare two values. There are a number of comparison operators in Greenfoot which can be used to determine game play decisions when combined with control statements.
Less than or equal
Greater than or equal
Use comparison operators to compare a randomized value to another value in a control statement.
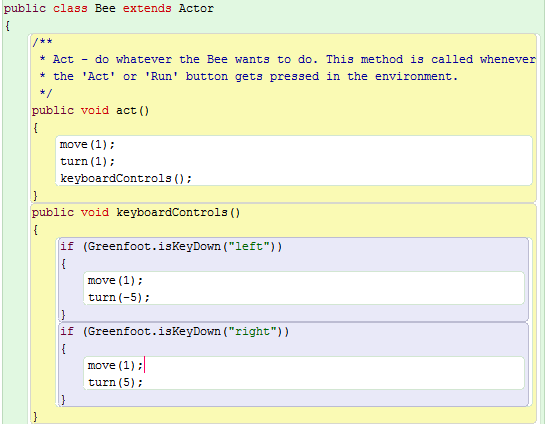
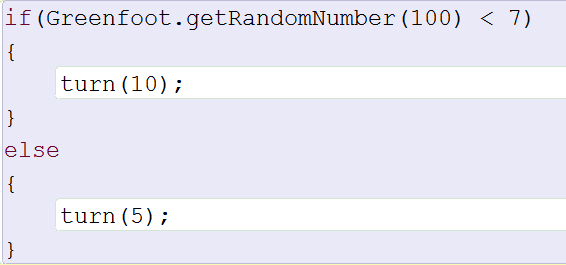
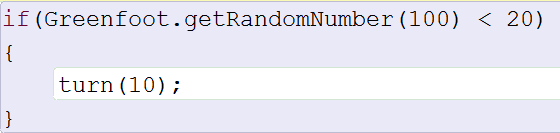
The example below determines if the random number is less than 20. If it is, then the object turns 10 degrees.
Problem: A butterfly object should move randomly so it is more challenging for the keyboard-controlled object, a bee, to avoid it.
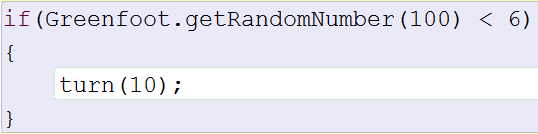
The programming statement below includes:
Watch this video to learn how to create a statement that uses comparison operators with randomization.
Download:
The Try it activity below requires that you start with the project file that was saved in the previous topic. Download and open this Greenfoot scenario file if you did not complete the previous topic's Try it activity.
Instructions:
In this lesson you have learned how to:
Watch this video to see a preview of what you will learn in this lesson.
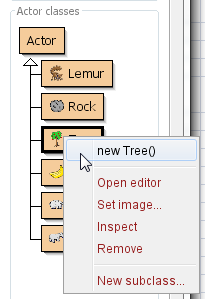
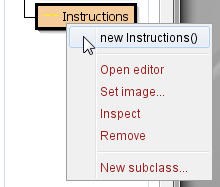
Adding an instance of an actor subclass to the world is accomplished when you right-click on the subclass name and choose the new option. Although it is not difficult to add the instance of the Actor subclasses manually, it can affect the game play of the scenario.
To improve the game play, you can program instances to be automatically added to the world, or constructed, when the scenario is initialized. Using the World subclass, actor instances can be programmed to automatically appear in the world at exact specified positions. Defining the creation of the instances to appear is known as creating a constructor. A constructor is made up of one or more programming instructions that specify how to automatically display instances in the world.
There is a difference between a world constructor and a constructor for an object.
To better understand how to automate creation of Actor instances, you need to understand how the World class source code is structured. The World constructor is used to automate creation of Actor instances when the scenario is initialized.
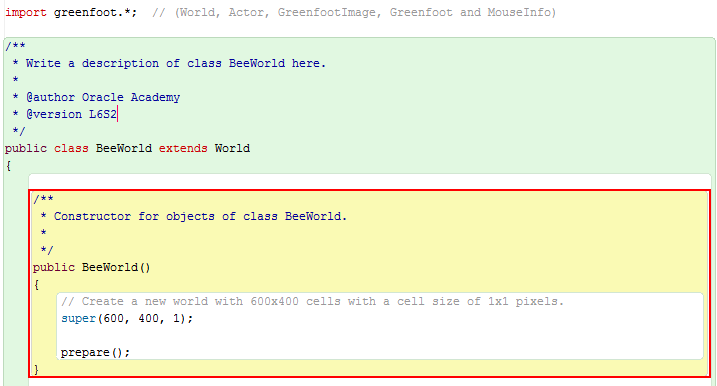
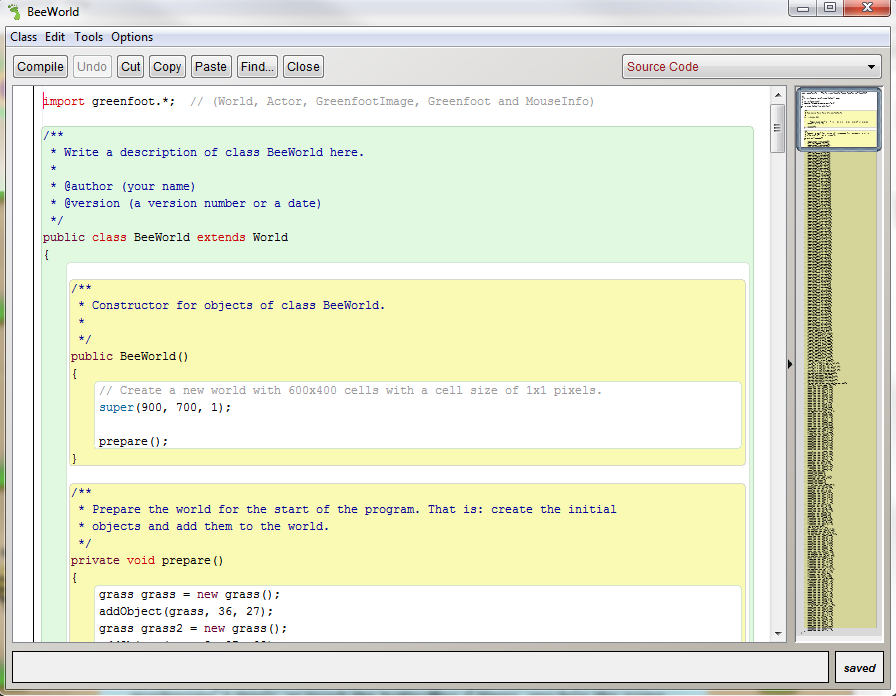
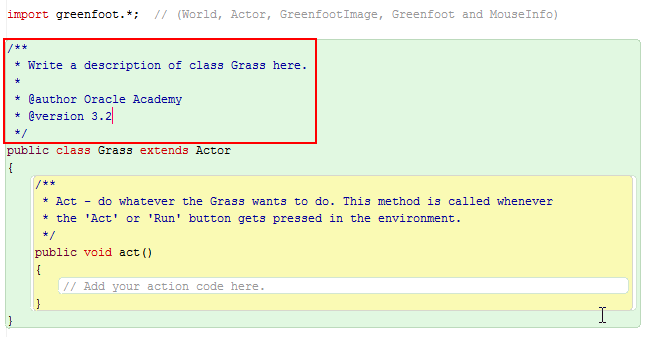
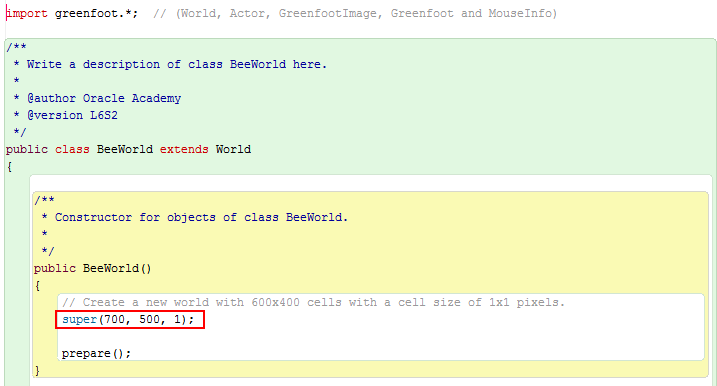
The import statement imports the following Greenfoot Classes from the API, giving the World class access to the methods of the following classes: World, Actor, GreenfootImage, Greenfoot and MouseInfo.
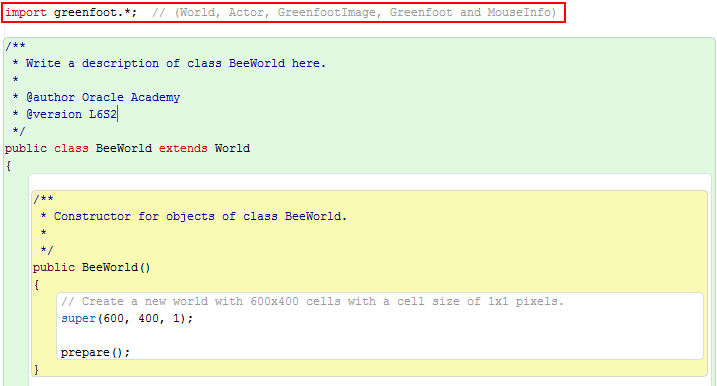
The class header provides the name of the class (BeeWorld) and the superclass from which it is inherited (World). The extends keyword is used to create a subclass. In this example, BeeWorld extends World, meaning BeeWorld is a subclass of the superclass World.

Using the World constructor, actor instances can be programmed to automatically appear in the world at exact specified positions so that the player does not have to manually add the objects to the game in order to play the game.
Watch this video to learn how to view the world constructor in the Greenfoot API and modify it in a scenario.
Download:
The Try it activity below requires that you start with the project file that was saved in the previous topic. Download and open this Greenfoot scenario file if you did not complete the previous topic's Try it activity.
Instructions:
Once you position the Actor instances in the world, use the Save the World feature to save the Actor instances and their coordinate positions. Then, each time you open and compile the scenario, those Actor instances will automatically appear in the scenario at the coordinates you specified. This makes it easy to prepare your scenario for gameplay so that the player does not have to manually add the objects to the game in order to play the game.
Steps to use the Save the World feature:
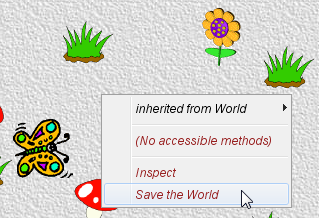
The world is now saved. Each time you open and compile the scenario, the instances will appear at the same position and coordinates.
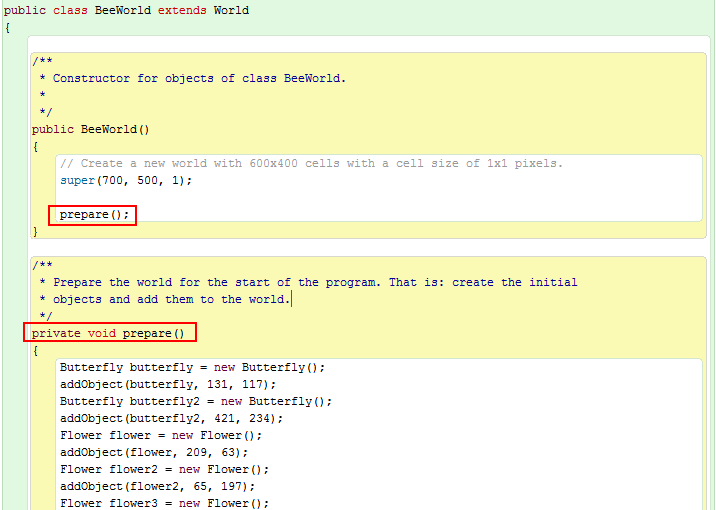
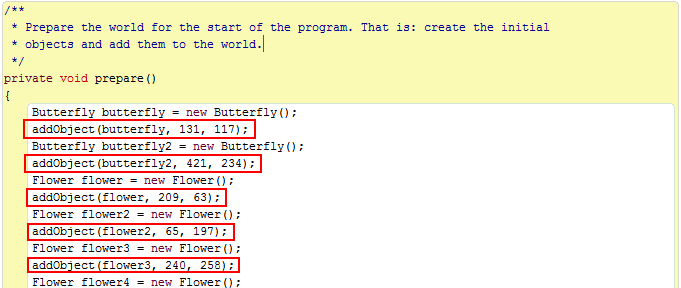
Open the World subclass's Code editor and examine the method prepare() that automatically creates and places the instances in the world. This method is called in the World constructor to create and place those instances in the world at the specified coordinates.
Watch this video to learn how to set up the scenario's instances for gameplay using the Save the World menu option.
Download:
The Try it activity below requires that you start with the project file that was saved in the previous topic. Download and open this Greenfoot scenario file if you did not complete the previous topic's Try it activity.
Instructions:
Using the World constructor, actor instances can be programmed to automatically appear in the world at exact specified positions so that the player does not have to manually add the objects to the game in order to play the game.
This requires two main components:
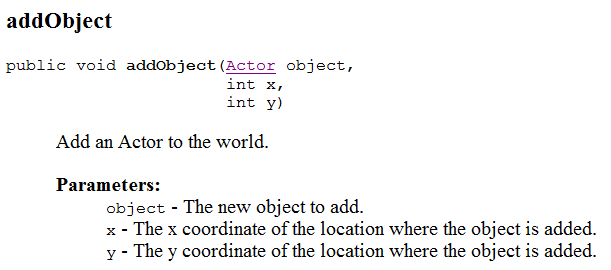
The addObject method is used to automatically add Actor instances, which requires the Actor class name and the x and y coordinates of the location in the world where the instance should be placed. A new instance is specified using the new keyword.
The addObject method is a World class method that adds a new object to the world at specific x and y coordinates. It includes:
The method signature of the addObject method is as follows:
This BeeWorld constructor calls the prepare() method, which adds an instance of the Bee class, the Instructions class, and several instances of the Mushroom, Flower, Grass, and Butterfly class at specified X and Y coordinates using the addObject method.
The new keyword creates new instances of existing classes. It starts with the keyword new, followed by the Actor class to create. When the new keyword is used and the actor class is specified, the constructor of the actor class is called.

In the above example, we are creating an instance of the Bee at specified x and y positions in the world. The parenthesis () after the keyword new and the actor class Bee are used to accept parameters that are passed to the Bee constructor. The parameter list would pass arguments (values) to the constructor that are needed to initialize the object's properties. The Bee class does not require parameters. A constructor without parameters is called a default constructor . A default constructor sets the object's properties to their default values.

Watch this video to learn how to add and modify instances in the World constructor.
Download:
The Try it activity below requires that you start with the project file that was saved in the previous topic. Download and open this Greenfoot scenario file if you did not complete the previous topic's Try it activity.
Instructions:
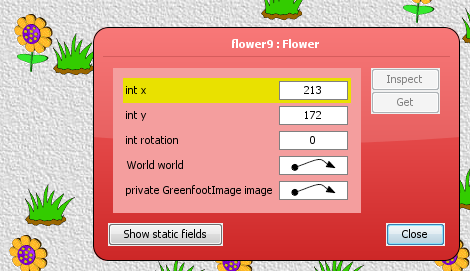
When adding instances to a world manually you can simply drag and drop the instance to the exact location desired. When programmatically adding instances to a world using a constructor, you will need to know the x and y coordinates of the desired object location. The x and y coordinate values of an instance are stored in instance variables.
A variable , or field, allows the instance to store information to use immediately or later. For example, object properties are variables that store information about the instance, such as its position in the world or the direction it is facing.
Object properties describe the instance's appearance and abilities, such as:
Object properties can be viewed and modified in the source code of the class. You can view the properties of an object in the class documentation.
For example, an Actor object would have properties such as:
Instance variables can be viewed using the Object Inspector. You can view the instance variables for any instance of any class in the World.
Steps to view instance variables using the object inspector:
Watch this video to learn how to view the instance variables of an object.
As we move about the world we live in, it's important for us to know our orientation, or sense of direction.
Methods can tell us how an object is positioned in the world, relative to itself and other objects. This is important in our game to know if an object is close enough to another object to eat it, or if an object has reached the edge of the world and needs to turn in order to keep moving.
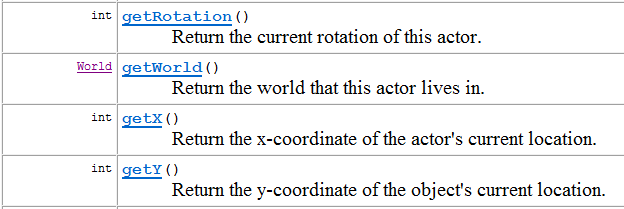
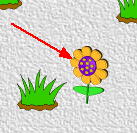
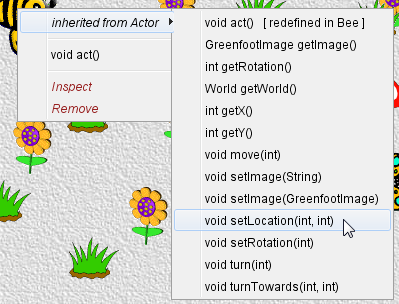
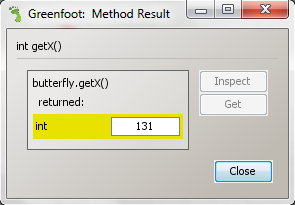
To find out information about an object, you can invoke a method from the scenario environment by right-clicking on the Actor subclass and choosing inherited methods. This will give you immediate information about the instance when the scenario is not running and will not impact the movement you are programming into your game.
You can invoke an inherited method:
Steps to invoke a method directly:
Watch this video to learn how to view an object's orientation, how to turn, and how to move an object by invoking a method directly.
Download:
The Try it activity below requires that you start with the project file that was saved in the previous topic. Download and open this Greenfoot scenario file if you did not complete the previous topic's Try it activity.
Instructions:
In this lesson you have learned how to:
In this lesson you will learn to:
Watch this video to see a preview of what you will learn in this lesson.
The Greenfoot API provides you with methods you can use to program keyboard interaction in your scenario.
Many modern games are controlled by a human or computer player using a remote control, mouse, or the keyboard. To turn your scenario into a game, you will write programming statements to control actions based on keyboard keys pressed.
The isKeyDown() method is used to determine if a key on the keyboard has been pressed.
The isKeyDown() method:
Method signature and description:
public static boolean isKeyDown(java.lang.String keyname)
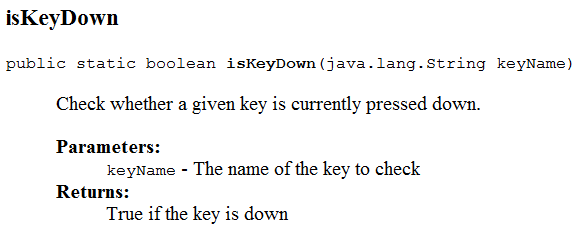
A String is a piece of text (character, word, sentence, or more) enclosed in double quotes. For example:
The String parameter in the isKeyDown() method expects the name of the key pressed on the keyboard.
Find a key’s name by looking at your keyboard. Sometimes the name isn't evident (right arrow key is called “right”).
The list of keys which can be used with the isKeyDown() method are as follows:
When you are in the Code editor and your cursor is positioned where you want to insert a new method, you can hold down the Control key on your keyboard while simultaneously pressing the Space bar to display a list of available methods. Selecting a method name and pressing the Enter key will insert the method into the Code editor.
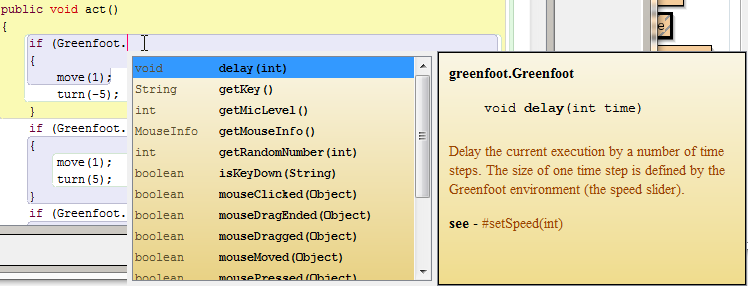
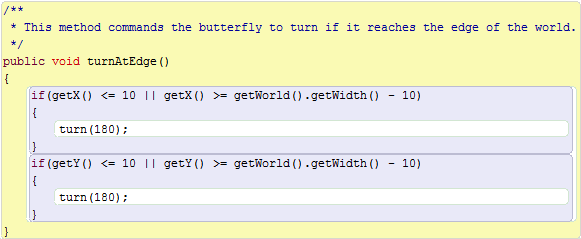
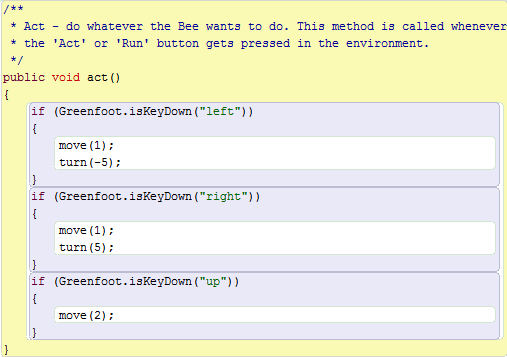
Examine the isKeyDown() Method in this example. This method, in the act() method, uses the left and right keys on the keyboard to allow the player to control the object's direction as it moves.
To insert an isKeyDown() method into the act() method of a class:


Watch this video to learn how to program keyboard interaction in your scenario using the isKeyDown() method.
Download:
The Try it activity below requires that you start with the project file that was saved in the previous topic. Download and open this Greenfoot scenario file if you did not complete the previous topic's Try it activity.
Instructions:
In addition to using the move() and turn() methods and keyboard keys to move an instance in the world, you can use the setLocation() method and mouse interaction to achieve the same results.
The setLocation() method moves an Actor to a precise location on the World. Using this method requires awareness of the Greenfoot World Coordinate System. The World starts at (0,0) at the top left and is built to the parameters for worldWidth, worldHeight and cellSize specified in the constructor.
The method signature for the setLocation() method contains:
public void setLocation(int x, int y)
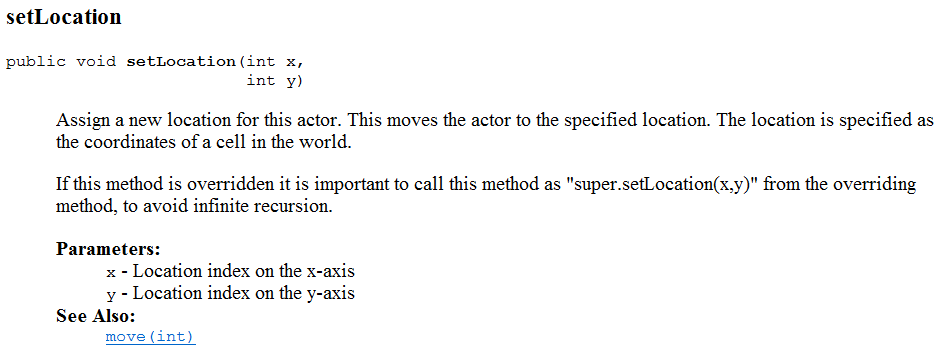
The setLocation() method expects a number argument in the parameter list for the x-position and y-position where the item is to be located.
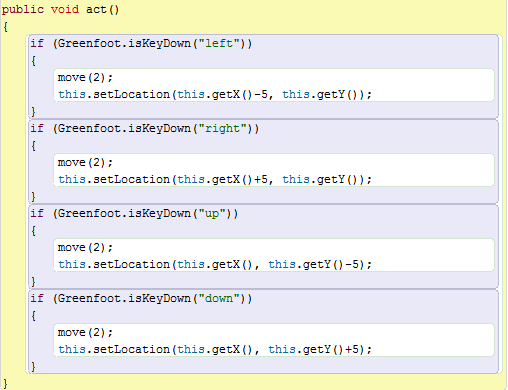
A combination of turn() and move() methods is often used to change the location of an instance when a key is pressed on the keyboard.
In the following example, the setLocation() method is used to move the object in place of the turn method. This will move the object to a precise location in the world when a key is pressed. A calculation based on the object's current position on the grid will determine where the object will move. Recall that the grid uses X and Y coordinate values to determine a location on the grid.
Evaluate this syntax:
To move the object up, determine the X and Y coordinates of the object's location, then move -5 pixels from the current Y coordinate value.
Watch this video to learn how to program precise keyboard interaction using the setLocation() method.
Download:
The Try it activity below requires that you start with the project file that was saved in the previous topic. Download and open this Greenfoot scenario file if you did not complete the previous topic's Try it activity.
Instructions:
As an alternative to keyboard interaction, the Greenfoot API provides us with methods we can use to program mouse interaction in our scenario. We can program statements that include mouse controls, so the player can control one or more objects in the game using their mouse. There are methods in the Greenfoot class that provide us with information about the player's mouse movements in the scenario.
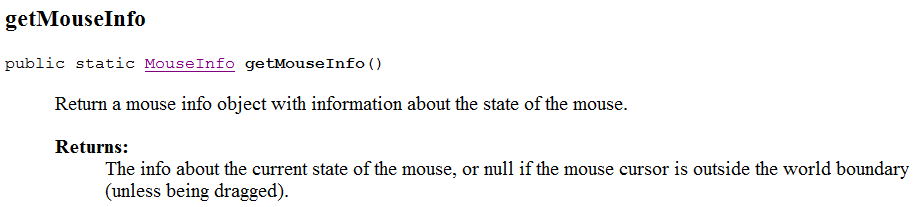
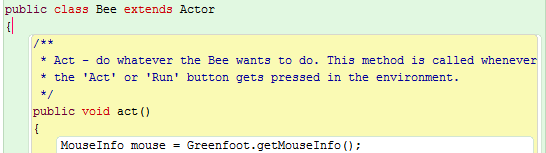
To program the mouse interactions in a scenario, we must be able to check the current position and state of the mouse. To do this, Greenfoot provides us with a getMouseInfo() method in the Greenfoot class which will return a MouseInfo object that can be used to check the current state of the mouse in the scenario.
Greenfoot also provides a MouseInfo class which has many methods available to set the state of the mouse in the scenario.

There are also many methods available in the Greenfoot class which we can use to program mouse interactions in our scenarios.

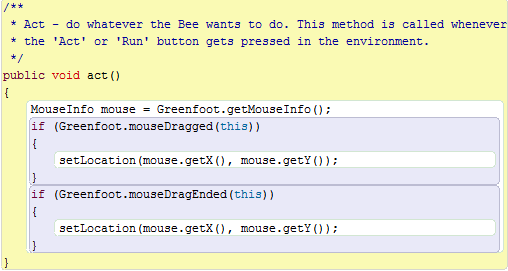
In the following example, we declare a local variable of type MouseInfo called mouse in the act() method. This calls the getMouseInfo() method to return a mouse info object with information about the state of the mouse at that point in the scenario.
MouseInfo mouse = Greenfoot.getMouseInfo();
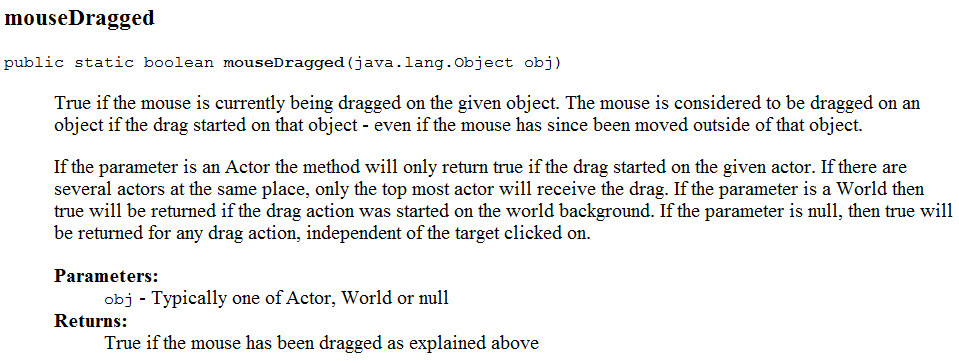
The mouseDragged() method will return true if the mouse has been dragged onto the object specified in the parameter. This method uses a parameter to specify the object.
Note that if the mouse is dragged over more than one object only the first object will be evaluated.
Examine the following example:

Examine the following example:

Examine the following code in the act() method. The code allows a player to control the object's direction using drag and drop interaction. The X and Y position of the object is updated as a result of the mouse movement.
Watch this video to learn how to program mouse interaction.
Download:
The Try it activity below requires that you start with the project file that was saved in the previous topic. Download and open this Greenfoot scenario file if you did not complete the previous topic's Try it activity.
Instructions:
The use of sounds in any scenario can enhance gameplay. Sounds can be used for background sound or to give feedback to a player when an event like winning, losing, or achieving minor victories occurs throughout a game. Sounds used in a scenario must be stored in the sounds directory of the scenario. Acceptable formats for sound files include: WAV, AIFF, and AU.
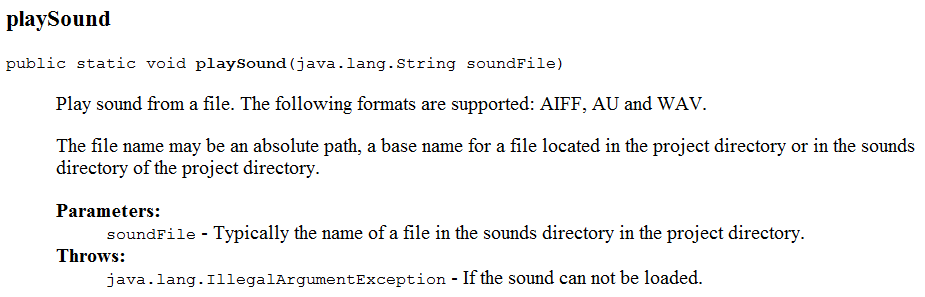
The playSound() method is used to play sounds in a scenario.
The playSound() method:
The method signature for the playSound() method is as follows:
Consider a scenario where you want a sound to play when the space key is pressed on the keyboard. Add the playSound() method to the act() method of the Actor object. The code in the act() method example below uses the space key on the keyboard to allow the player to control the object’s random moves. Each time the space bar is pressed the object will move and the sound file spin.wav will play.

Watch this video to learn how to import pre-recorded sounds into Greenfoot.
Download:
The Try it activity below requires that you start with the project file that was saved in the previous topic. Download and open this Greenfoot scenario file if you did not complete the previous topic's Try it activity.
Instructions:
Greenfoot offers the ability to record your own sounds within the IDE.
Steps to record original sounds in Greenfoot:
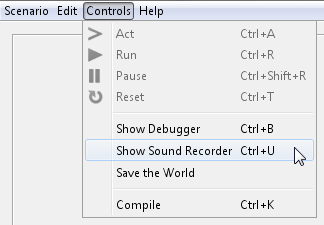
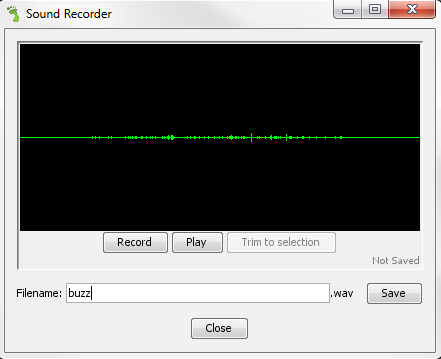
Watch this video to learn how to record a sound file in Greenfoot.
Download:
The Try it activity below requires that you start with the project file that was saved in the previous topic. Download and open this Greenfoot scenario file if you did not complete the previous topic's Try it activity.
Instructions:
In this lesson you have learned how to:
In this lesson you will learn to:
Watch this video to see a preview of what you will learn in this lesson.
When a subclass is created in Greenfoot, we specify the image that represents the instance when it is added to the scenario. Greenfoot offers many images to choose from when creating a subclass. During program execution the image for the instance will remain the same unless changed programmatically.
Using either method, adding instances to the world using the new() method, or adding instances to the world using a constructor causes Greenfot to reference the image specified for the class.
When creating a subclass, you can specify an image from the available Greenfoot image listing or you can import an image from your computer, hard drive, or USB drive into the Greenfoot image gallery. Image files imported can be jpeg, gif, or png format types.
To make instances appear animated in a game, they need to change from one image to another during program execution. Changing from one image to another can show movement or event change during program execution. Let's examine a few examples.

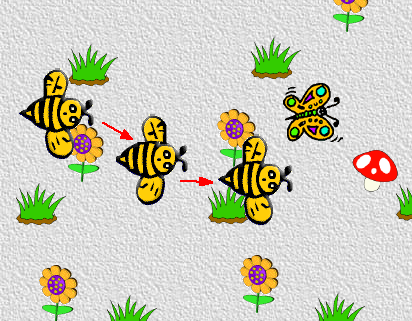
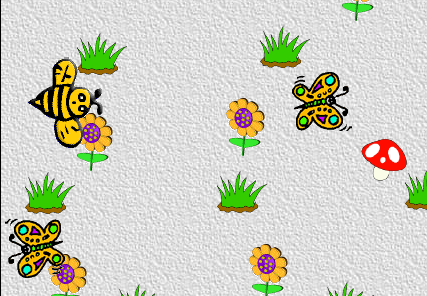
Image changes can be used to improve the look and feel of your scenarios and to enhance game play.
To change the image of an instance for a scenario you need to:
To change the image of an instance programmatically, use the setImage() methods. There are two setimage() method parameters that can be used to set an image for an instance programmatically.
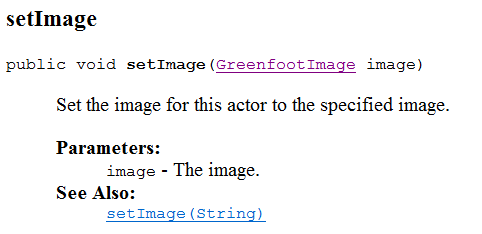
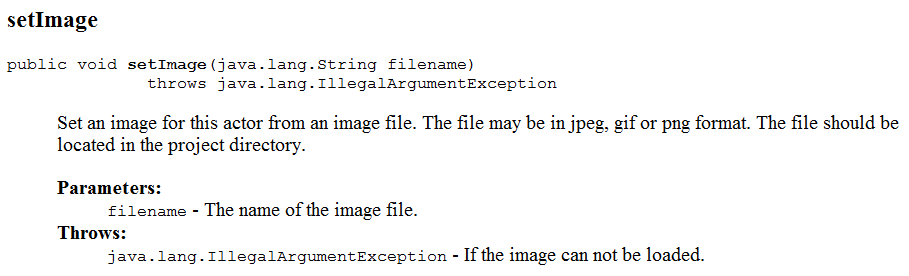
Either setimage() method can be used to change an image for an instance, however; it should be noted that an image with a Greenfootimage image type is more efficient when multiple instances are created in a world.
Using either setImage() method parameter, you must have an image to specify. You can view the images you have currently stored for use by the instances in your scenario two ways:
Consider a scenario where a bee is controlled with the arrow keys on the keyboard, but the image displayed is always static, meaning that it never changes.

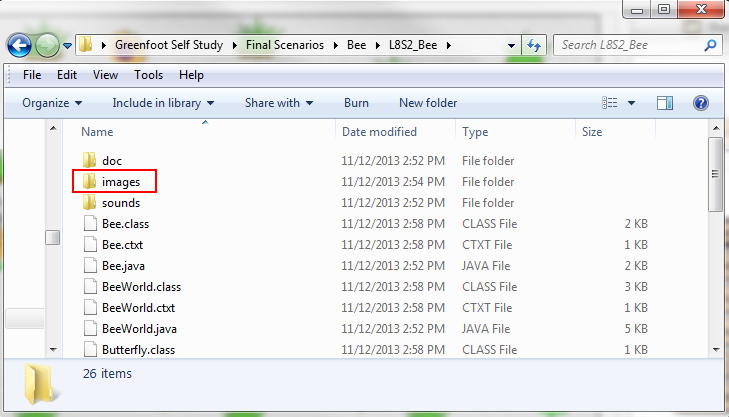
Above you see the original bee image (bee.png). This file is stored in the images directory of the scenario and can be assigned to an actor using the setImage() method.
To turn the Bee to face the same direction as the direction pressed with the keyboard keys, you will need a second image of the Bee facing the other direction. You can create another image of the Bee by opening the current Bee image in a paint or image editing program, rotate the image, and then save the image resulting in 4 total image files (one image file for each direction).
Now you can use the setImage() method to assign the correct image to the key that is pressed, giving the illusion that the bee is facing different directions. For example, if the left arrow is pressed, the Bee faces left and if the right arrow is pressed, the Bee faces right.

Add the code for the Bee in the act() method for the if condition. For:
Repeat for the other three directions.